目录

Linux x86 Program Start Up or - How the heck do we get to main()?


概述

  • 文章介绍了X86系统main函数调用前后的一些细节,并阐述了C程序的构造函数析构函数以及.init,.fini,init_arrayfini_array各section相对于main函数及彼此的执行顺序。遗憾的是这篇文章是基于32位CPU架构来研究的

  • 文章对$debug$ main函数之前的代码有一定的帮助效果

  • 主要介绍了X86 ELF文件的动态加载过程

/img/Operating System/support2-1.png
总体流程图

调用过程分析

main函数的调用

  • 先写一个最简单的C程序prog1.c
1
2
3
int main() {
    
}
  • 编译一下
1
gcc -ggdb -o prog1 prog1.c

注:-ggdb的选项作用:生成gdb专用的调试信息,会有一些gdb专用的扩展

  • 然后我们用objdump做一下反汇编
1
objdump -d prog1 > prog1.asm

从我们终端敲回车到程序被载入执行的过程中发生了什么?

  • 当我们从终端输入要运行的程序或者是从有关的gui界面点击相关的button的时候,shell或者gui就会调用execve()。这里不是我们重点关心的地方,简单来说,execve()会设立一个栈,然后将参数argcargvenvp压入栈中。文件描述符0,1,2(stdin, stdout和stderr)由之前的shell设置,加载器会帮我们完成有关重定位的许多工作,当所有搞定之后,控制权会传递给_start()
/img/Operating System/support2-2.png
shell输入man execve之后的函数声明和所在位置
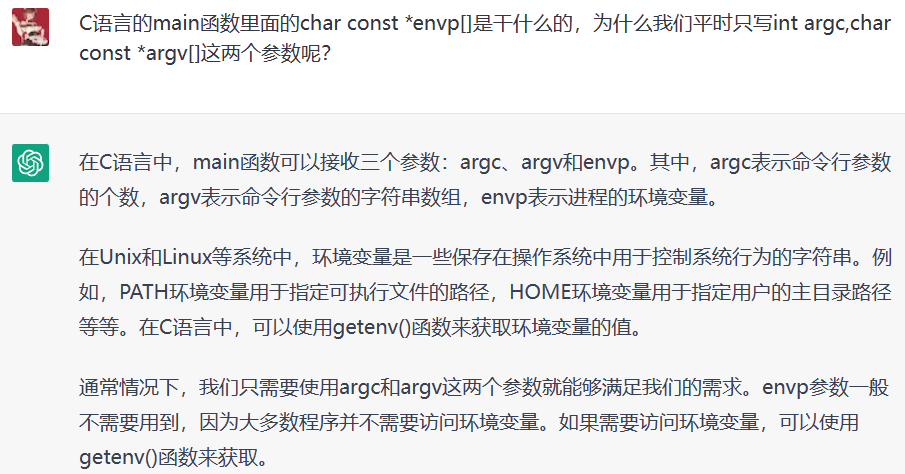
/img/Operating System/support2-4.png
evnp

_start()

 1
 2
 3
 4
 5
 6
 7
 8
 9
10
11
12
13
14
15
080482e0 <_start>:
80482e0:       31 ed                   xor    %ebp,%ebp
80482e2:       5e                      pop    %esi
80482e3:       89 e1                   mov    %esp,%ecx
80482e5:       83 e4 f0                and    $0xfffffff0,%esp
80482e8:       50                      push   %eax
80482e9:       54                      push   %esp
80482ea:       52                      push   %edx
80482eb:       68 00 84 04 08          push   $0x8048400
80482f0:       68 a0 83 04 08          push   $0x80483a0
80482f5:       51                      push   %ecx
80482f6:       56                      push   %esi
80482f7:       68 94 83 04 08          push   $0x8048394
80482fc:       e8 c3 ff ff ff          call   80482c4 <__libc_start_main@plt>
8048301:       f4                      hlt
  • 任何值xor自身得到的结果都是0。所以xor %ebp,%ebp语句会把%ebp设置为0。ABI(Application Binary Interface specification)推荐这么做,目的是为了标记最外层函数的页帧(frame)
  • 接下来,从栈中弹出栈顶的值保存到%esi。在最开始的时候我们把argcargvenvp放到了栈里,所以现在的pop语句会把argc放到%esi
  • 这里只是临时保存一下,稍后我们会把它再次压回栈中
  • 因为我们弹出了argc,所以%ebp现在指向的是argvmov指令把argv放到了%ecx中,但是并没有移动栈指针
  • 然后,将栈指针和一个可以清除后四位的掩码做and操作。根据当前栈指针的位置不同,栈指针将会向下移动0到15个字节。这么做,保证了任何情况下,栈指针都是16字节的偶数倍对齐的。对齐的目的是保证栈上所有的变量都能够被内存和cache快速的访问
  • 要求这么做的是SSE,就是指令都能在单精度浮点数组上工作的那个(扩展指令集)
  • 例子:某次运行时,_start函数刚被调用的时候,%esp处于0xbffff770。在我们从栈上弹出argc后,%esp指向0xbffff774。它向高地址移动了(栈向下增长)。当对栈指针执行了and操作后,栈指针回到了0xbffff770

__libc_start_main

  • 现在,我们把__libc_start_main函数的参数压入栈中。第一个参数%eax被压入栈中,里面保存了无效信息,原因是稍后会有七个参数将被压入栈中,但是为了保证16字节对齐,所以需要第八个参数。这个值也并不会被用到。__libc_start_main是在链接的时候从glibc复制过来的。在glibc的代码中,它位于csu/libc-start.c文件里。__libc_start_main的定义如下
1
2
3
4
5
6
int __libc_start_main(  int (*main) (int, char * *, char * *),
                int argc, char * * ubp_av,
                void (*init) (void),
                void (*fini) (void),
                void (*rtld_fini) (void),
                void (* stack_end));
/img/Operating System/support2-3.jpg
参数说明
  • __libc_csu_fini函数也是从glibc被链接进我们代码的,它的源代码位于csu/elf-init.c中

环境变量哪里去了?

  • 我们并没有获取envp(栈里指向我们环境变量的指针)?它并不是__libc_start_main函数的参数。但是我们知道main函数的原型其实是int main(int argc, char** argv, char** envp)。所以,到底怎么回事?

  • 其实,__libc_start_main函数会调用__libc_init_first,这个函数会使用内部信息去找到环境变量(实际上环境变量就位于argv的终止字符null的后面),然后设置一个全局变量__environ,这个全局变量可以被__libc_start_main函数内部任何地方使用,包括调用main函数时。当envp建立了之后,__libc_start_main函数会使用相同的小技巧,越过envp数组之后的NULL字符,获取另一个向量——ELF辅助向量(加载器使用它给进程传递一些信息)

1
2
3
4
5
6
void __libc_init_first(int argc, char *arg0, ...)
{
    char **argv = &arg0, **envp = &argv[argc + 1];
    __environ = envp;
    __libc_init (argc, argv, envp);
}
  • 运行程序前,设置环境变量LD_SHOW_AUXV=1,可以查看里面的内容
 1
 2
 3
 4
 5
 6
 7
 8
 9
10
11
12
13
14
15
16
17
18
19
20
21
22
$ LD_SHOW_AUXV=1 ./prog1
AT_SYSINFO:      0xe62414
AT_SYSINFO_EHDR: 0xe62000
AT_HWCAP:    fpu vme de pse tsc msr pae mce cx8 apic
             mtrr pge mca cmov pat pse36 clflush dts
             acpi mmx fxsr sse sse2 ss ht tm pbe
AT_PAGESZ:       4096
AT_CLKTCK:       100
AT_PHDR:         0x8048034
AT_PHENT:        32
AT_PHNUM:        8
AT_BASE:         0x686000
AT_FLAGS:        0x0
AT_ENTRY:        0x80482e0
AT_UID:          1002
AT_EUID:         1002
AT_GID:          1000
AT_EGID:         1000
AT_SECURE:       0
AT_RANDOM:       0xbff09acb
AT_EXECFN:       ./prog1
AT_PLATFORM:     i686
  • 各种各样的信息。AT_ENTRY_start的地址,还有我们的UID、有效UID和GID

  • __libc_start_main功能总结

    • 处理关于setuid、setgid程序的安全问题
    • 启动线程
    • fini函数和rtld_fini函数作为参数传递给at_exit调用,使它们在at_exit里被调用,从而完成用户程序和加载器的调用结束之后的清理工作
    • 调用其init参数
    • 调用main函数,并把argcargv参数、环境变量传递给它
    • 调用exit函数,并将main函数的返回值传递给它

__libc_csu_init

  • __libc_start_main函数的init参数被设置成了__libc_csu_init函数,它也是被链接进我们代码的。它来源于glibc源代码中的csu/elf-init.c。其C代码如下(原代码只不过多了一些#ifdef):
1
2
3
4
5
6
7
8
9
void __libc_csu_init (int argc, char **argv, char **envp)
{

  _init ();

  const size_t size = __init_array_end - __init_array_start;
  for (size_t i = 0; i < size; i++)
      (*__init_array_start [i]) (argc, argv, envp);
}
  • 功能:用户应用程序的构造函数

  • __libc_csu_init函数相当重要,因为它是我们可执行程序的构造函数

    • ???这不是C++,哪里来的构造函数??? $\Longrightarrow$ 构造函数和析构函数的概念并非属于C++,它诞生早于C++
    • 对于任意的可执行程序都可以有一个C函数的构造函数__libc_csu_init和C函数的析构函数__libc_csu_fini在构造函数内部,可执行程序会找到全局C函数组成的构造函数集,并且调用它们。(任何一个C程序都是可以有构造函数集的) $\Longrightarrow$ the executable will look for global C level constructors and call any that it finds. It’s possible for a C program to also have these(原文)
  • __libc_csu_init函数的反汇编代码

 1
 2
 3
 4
 5
 6
 7
 8
 9
10
11
12
13
14
15
16
17
18
19
20
21
22
23
24
25
26
27
28
29
30
31
32
33
080483a0 <__libc_csu_init>:
 80483a0:       55                      push   %ebp
 80483a1:       89 e5                   mov    %esp,%ebp
 80483a3:       57                      push   %edi
 80483a4:       56                      push   %esi
 80483a5:       53                      push   %ebx
 80483a6:       e8 5a 00 00 00          call   8048405 <__i686.get_pc_thunk.bx>
 80483ab:       81 c3 49 1c 00 00       add    $0x1c49,%ebx
 80483b1:       83 ec 1c                sub    $0x1c,%esp
 80483b4:       e8 bb fe ff ff          call   8048274 <_init>
 80483b9:       8d bb 20 ff ff ff       lea    -0xe0(%ebx),%edi
 80483bf:       8d 83 20 ff ff ff       lea    -0xe0(%ebx),%eax
 80483c5:       29 c7                   sub    %eax,%edi
 80483c7:       c1 ff 02                sar    $0x2,%edi
 80483ca:       85 ff                   test   %edi,%edi
 80483cc:       74 24                   je     80483f2 <__libc_csu_init+0x52>
 80483ce:       31 f6                   xor    %esi,%esi
 80483d0:       8b 45 10                mov    0x10(%ebp),%eax
 80483d3:       89 44 24 08             mov    %eax,0x8(%esp)
 80483d7:       8b 45 0c                mov    0xc(%ebp),%eax
 80483da:       89 44 24 04             mov    %eax,0x4(%esp)
 80483de:       8b 45 08                mov    0x8(%ebp),%eax
 80483e1:       89 04 24                mov    %eax,(%esp)
 80483e4:       ff 94 b3 20 ff ff ff    call   *-0xe0(%ebx,%esi,4)
 80483eb:       83 c6 01                add    $0x1,%esi
 80483ee:       39 fe                   cmp    %edi,%esi
 80483f0:       72 de                   jb     80483d0 <__libc_csu_init+0x30>
 80483f2:       83 c4 1c                add    $0x1c,%esp
 80483f5:       5b                      pop    %ebx
 80483f6:       5e                      pop    %esi
 80483f7:       5f                      pop    %edi
 80483f8:       5d                      pop    %ebp
 80483f9:       c3                      ret
这个函数都做了什么?
get_pc_truck函数
  • 该函数是给位置无关码使用的。设置它们可以让位置无关码正常工作。为了让它们工作,基址寄存器(%ebp)需要知道GLOBAL_OFFSET_TABLE。其部分代码如下
1
2
3
4
5
6
7
push %ebx
call __get_pc_thunk_bx
add  $_GLOBAL_OFFSET_TABLE_,%ebx

__get_pc_thunk_bx:
movel (%esp),%ebx
return
  • 过程分析

    • 调用__get_pc_thunk_bx时,像所有其他函数调用一样,将下一条指令的地址压入栈中(计组:保存上一级程序的PC)。这样,当函数返回时,就会继续执行下条指令

    • __get_pc_thunk_bx中,我们将返回地址从栈中复制到%ebx中。当返回的时候,下条指令会把_GLOBAL_OFFSET_TABLE_加到%ebx上去(前3句)

    • 其中_GLOBAL_OFFSET_TABLE_代表了当前地址和位置无关码使用的GOT(global offset table)的差值

    • GOT中保存了我们想访问的变量的指针的集合,并且我们只需要知道数据在这个表中的偏移量就行

    • 加载器会为我们修改这个表里面的地址。对于函数来讲,也有一个类似的表(PLT)

    • 汇编里面这么编写实在是太烦人了,但是,在C或者C++中,你可以将-pic参数传递给编译器,它将会自动帮你完成这个工作(你知道你不用关心这个事情就可以了(md就怕自己再™️钻牛角尖))

  • 和64位有关的区别

上述·get_pc_truck·函数的主要目的其实是获取变量对应的GOT,以通过它获取变量真正的值。之所以这么写,是因为在32位系统里,没有类似于rip的寄存器,因此并不能直接获取当前指令的地址,而在64位系统里就不用这种小技巧了

剩下的循环在干什么?
  • 现在我们只要记住:翻译的不好,这里建议看原文

For now, just remember that it calls any C level initializers for our program.

中文翻译版:

它调用了用户程序中所有用C代码编写的initializers

  • 中文这个版本容易让人看跑了,这个C代码不一定是自己编写的,只要是C level级别的initializers(后面有预处理,链接,中译容易让人看跑)

_init函数分析

源码
 1
 2
 3
 4
 5
 6
 7
 8
 9
10
11
12
13
14
15
16
17
18
08048274 <_init>:
 8048274:       55                      push   %ebp
 8048275:       89 e5                   mov    %esp,%ebp
 8048277:       53                      push   %ebx
 8048278:       83 ec 04                sub    $0x4,%esp
 804827b:       e8 00 00 00 00          call   8048280 <_init+0xc>
 8048280:       5b                      pop    %ebx
 8048281:       81 c3 74 1d 00 00       add    $0x1d74,%ebx        (.got.plt)
 8048287:       8b 93 fc ff ff ff       mov    -0x4(%ebx),%edx
 804828d:       85 d2                   test   %edx,%edx
 804828f:       74 05                   je     8048296 <_init+0x22>
 8048291:       e8 1e 00 00 00          call   80482b4 <__gmon_start__@plt>
 8048296:       e8 d5 00 00 00          call   8048370 <frame_dummy>
 804829b:       e8 70 01 00 00          call   8048410 <__do_global_ctors_aux>
 80482a0:       58                      pop    %eax
 80482a1:       5b                      pop    %ebx
 80482a2:       c9                      leave
 80482a3:       c3                      ret
调用
  • 当加载器将控制权交给_
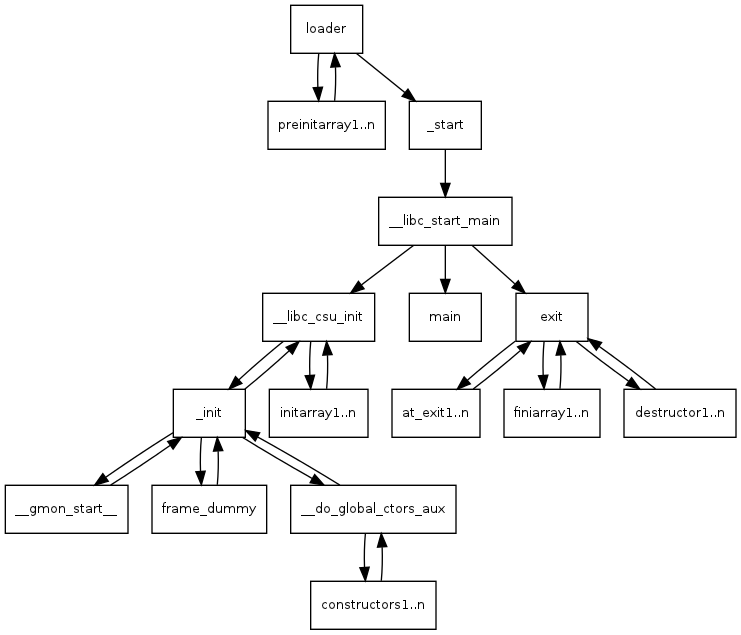
start函数之后,_start函数将会调用__libc_start_main函数,__libc_start_main函数会调用__libc_csu_init函数, __libc_csu_init函数会调用_init函数
Update

End in 2023-03-08 0:44

这种真🐔8️⃣👨的文章真是看点就看不下去了,明天概率论,先睡

55今天玩了5h ⚪,晚上卸载之后🎠自己是S🅱️,只能说是dinner行为了吧

_init函数起始于常规的C函数调用
Update

Update in 2023-03-08 10:04

睡醒了,感觉看了能有一半多了,今天再看点

  • 如果想要详细了解C函数调用规范,请阅读《Basic Assembler Debugging with GDB》

  • 大致过程

    • 调用者的基址寄存器(%ebp)会被保存到栈里(8048274)
    • 当前函数的基址寄存器(%ebp)会指向栈顶(8048275)
    • 然后,保留4个字节空间(8048278) $\Longrightarrow$ 更好的解释是push之后%esp要sub $0x4 来保证栈指针仍然指向栈顶(栈向下增长)
    • 这个过程和调用get_pc_trunk非常像
  • 要大致了解一下stack和function调用的关系,阅读文章《汇编-栈帧-寄存器esp, ebp》

  • 如果你仔细看的话,发现调用的是下一条指令的地址???啥操作???

1
2
 804827b:       e8 00 00 00 00          call   8048280 <_init+0xc>
 8048280:       5b                      pop    %ebx
  • 给人感觉这就是在顺序执行,不过你要用函数调用的压栈出栈来干什么?
    • $\Longrightarrow$ 当前的地址被压入了栈中。然后通过弹出栈操作,又把它放到了%ebx中,之后就可以用它来设置访问全局访问表了(.got.plt)
1
2
3
4
5
 8048277:       53                      push   %ebx
 8048278:       83 ec 04                sub    $0x4,%esp
 804827b:       e8 00 00 00 00          call   8048280 <_init+0xc>
 8048280:       5b                      pop    %ebx
 8048281:       81 c3 74 1d 00 00       add    $0x1d74,%ebx        (.got.plt)

gmon_start函数分析

生成profile文件
  • gmon_start函数。如果它是空的,我们跳过它,不调用它。否则,调用它来设置profiling。该函数调用一个例程开始profiling,并且调用at_exit去调用另一个程序运行,并且在运行结束的时候生成gmon.out

为了优化软件中频繁调用的部分,从而提高程序整体执行的效率,我们可以在使用gcc编译的时候加上 -pg标志。这样在程序运行结束的时候会生成一个记录程序运行状态的文件叫做gmon.out。然后,我们可以使用一个名为gprof的GNU profiler工具来分析该文件从而获得程序各部分的运行时间,来反映其运行性能

相关文章:《Home IBM Developer》

frame_dummy函数分析

  • 无论那种情况(前面函数的执行情况)(原文是In either case),下一步我们将调用frame_dummy函数
  • frame_dummy函数的目的是调用__register_frame_info函数,但是,调用frame_dummy是为了给上述函数设置参数。这么做的目的是为了在出错时设置unwinding stack frames $\Longrightarrow$ 不是本次重点,想了解请阅读《What is stack unwinding?》

_do_global_ctors_aux $\Longrightarrow$ Finally we’re getting constructive!

  • 如果在调用main函数之前,你的程序出了问题,你很可能需要看看这个函数。当然,这里存放了全局C++对象的构造函数,但是,这里也能存放其他东西。
Example
  • 我们把prog1.c修改为prog2.c
 1
 2
 3
 4
 5
 6
 7
 8
 9
10
#include <stdio.h>

void __attribute__ ((constructor)) a_constructor() {
    printf("%s\n", __FUNCTION__);
}

int main()
{
    printf("%s\n",__FUNCTION__);
}
  • void __attribute__ ((constructor)) a_constructor():它告诉GCC:链接器应该在__do_global_ctors_aux使用的表里创建一个指针指向这里

  • __FUNCTION__被编译器替换成了当前函数的名字

  • 运行

1
2
3
$ ./prog2
a_constructor
main
 1
 2
 3
 4
 5
 6
 7
 8
 9
10
11
12
13
14
15
16
17
18
08048290 <_init>:
 8048290:       55                      push   %ebp
 8048291:       89 e5                   mov    %esp,%ebp
 8048293:       53                      push   %ebx
 8048294:       83 ec 04                sub    $0x4,%esp
 8048297:       e8 00 00 00 00          call   804829c <_init+0xc>
 804829c:       5b                      pop    %ebx
 804829d:       81 c3 58 1d 00 00       add    $0x1d58,%ebx
 80482a3:       8b 93 fc ff ff ff       mov    -0x4(%ebx),%edx
 80482a9:       85 d2                   test   %edx,%edx
 80482ab:       74 05                   je     80482b2 <_init+0x22>
 80482ad:       e8 1e 00 00 00          call   80482d0 <__gmon_start__@plt>
 80482b2:       e8 d9 00 00 00          call   8048390 <frame_dummy>
 80482b7:       e8 94 01 00 00          call   8048450 <__do_global_ctors_aux>
 80482bc:       58                      pop    %eax
 80482bd:       5b                      pop    %ebx
 80482be:       c9                      leave
 80482bf:       c3                      ret
  • 我们可以看到,上述的地址和prog1的地址略微有所不同。这些有差异的地址似乎相对于prog1移动了28个字节这里,有两个函数:"a_constructor"(加上结束符一共14个字节)、"main"(加上结束符一共5个字节)和两个格式化字符串"%s\n"(2*4个字节,加上一个1字节的换行符和终止符),所以14 + 5 + 4 + 4 = 27? 似乎还差一个。不管怎样,这只是个猜想,我就不仔细研究了。然后我们就要跳入到__do_global_ctors_aux函数中去,看看到底发生了什么。
源码
  • 位于GCC源码中的gcc/crtstuff.c里
1
2
3
4
5
6
__do_global_ctors_aux (void)
{
  func_ptr *p;
  for (p = __CTOR_END__ - 1; *p != (func_ptr) -1; p--)
    (*p) ();
}
  • 如上所示,p的值被初始化成__CTOR_END__减去一个字节。这是一种指针算法
    • 如果指针指向一个函数,在这种情况下,-1表示向上移动一个指针或者说4个字节We’ll see that in the assembler as well. While the pointer doesn’t have a value of -1 (cast to a pointer), we’ll call the function we’re pointing at, and then back the pointer up again
    • 这个指针数组起始于-1,并且包含若干个函数指针
对应的汇编
 1
 2
 3
 4
 5
 6
 7
 8
 9
10
11
12
13
14
15
16
17
18
19
08048450 <__do_global_ctors_aux>:
 8048450:       55                      push   %ebp
 8048451:       89 e5                   mov    %esp,%ebp
 8048453:       53                      push   %ebx
 8048454:       83 ec 04                sub    $0x4,%esp
 8048457:       a1 14 9f 04 08          mov    0x8049f14,%eax
 804845c:       83 f8 ff                cmp    $0xffffffff,%eax
 804845f:       74 13                   je     8048474 <__do_global_ctors_aux+0x24>
 8048461:       bb 14 9f 04 08          mov    $0x8049f14,%ebx
 8048466:       66 90                   xchg   %ax,%ax
 8048468:       83 eb 04                sub    $0x4,%ebx
 804846b:       ff d0                   call   *%eax
 804846d:       8b 03                   mov    (%ebx),%eax
 804846f:       83 f8 ff                cmp    $0xffffffff,%eax
 8048472:       75 f4                   jne    8048468 <__do_global_ctors_aux+0x18>
 8048474:       83 c4 04                add    $0x4,%esp
 8048477:       5b                      pop    %ebx
 8048478:       5d                      pop    %ebp
 8048479:       c3                      ret
函数最开始的部分
  • 函数最开始的部分依然遵从了C函数正常的调用惯例(保存调用者的栈基址寄存器,设置当前函数的栈基址寄存器),本函数中还增加了一点:额外把%ebx保存到了栈中,因为这个函数后面会使用到它。同时,我们也为(C代码中的)指针p保留了空间。你可能注意到了,即使我们在栈上为其开辟了空间,但是从未使用这部分空间。取而代之的是,p将会保存到%ebx中,*p会保存到%eax。$\Longrightarrow$ 注意看前面_init的汇编,函数执行完栈里面弹出来的东西,在本函数的汇编里面没找到 (ⓜ️D,真TM难找)
1
2
3
 80482b7:       e8 94 01 00 00          call   8048450 <__do_global_ctors_aux>
 80482bc:       58                      pop    %eax
 80482bd:       5b                      pop    %ebx
循环之前的设置
  • 看起来编译器做了一些优化,编译器并没有直接“加载__CTOR_END__,然后将其值减去1,再查找它指向的内容”,而是直接加载*(__CTOR_END__ - 1),这是一个立即数0x8049f14(注意,$0x8049f14意思是一个立即数,而不带$,只写0x8049f14的意思是这个地址指向的内容)。这个数里面的内容被直接放到了%eax中,然后立刻比较%eax和-1,如果相等,则跳转到地址0x8048474,回收栈,弹出我们保存在栈里的内容,函数调用结束,返回。
  • 假设在函数表中至少有一个值,立即数0x8049f14被存放到%ebx,也就是函数指针p,然后执行指令xchg %ax,%ax,这是什么鬼?$\Downarrow$
1
2
 8048461:       bb 14 9f 04 08          mov    $0x8049f14,%ebx
 8048466:       66 90                   xchg   %ax,%ax
  • 原来这是X86 16或者32位里的一个nop(No Operation)语句。它什么也不做,只是占据了一个指令周期,起一个占位符作用而已。在这种情况下,使循环开始于8048468,而不是8048466这么做的好处是使循环开始的地方以4字节对齐,这样整个循环将会极大可能的被保存到一个cache line里,而不会被分成两段,从而起到加速执行的作用 (这段感觉编译器好🐮🅱️啊)
  • 接下来,将%ebx减去4,从而为下一次循环做好准备,调用%eax里保存的地址对应的函数,然后将下一个函数指针移至%eax中,并且和-1比较,如果不等于-1,再次调回到上述循环
And finally the epilogue

Otherwise we fall through into our function epilogue and return to _init, which immediately falls through into its epilogue and returns to libc_csu_init. Bet you forgot all about him. There’s still a loop to deal with there but first–

使用gdb检测prog2
  • GDB总是显示你将要执行的下一行或者下一条指令
1
2
3
4
5
6
$ !gdb
gdb prog2
Reading symbols from /home/patrick/src/asm/prog2...done.
(gdb) set disassemble-next-line on
(gdb) b *0x80482b7
Breakpoint 1 at 0x80482b7
  • 运行调试器,打开disassemble-next-line,这样它就会总是显示下一条将要执行的指令的汇编代码,然后我们在_init函数将要调用__do_global_ctors_aux函数的地方设置一个断点
1
2
3
4
5
6
7
8
(gdb) r
Starting program: /home/patrick/src/asm/prog2 

Breakpoint 1, 0x080482b7 in _init ()
=> 0x080482b7 <_init+39>:    e8 94 01 00 00 call   0x8048450 <__do_global_ctors_aux>
(gdb) si
0x08048450 in __do_global_ctors_aux ()
=> 0x08048450 <__do_global_ctors_aux+0>:     55 push   %ebp
  • 输入r继续运行程序,到达断点处。再输入si单步执行指令,现在我们进入了__do_global_ctors_aux函数内部。后面你会看到若干次我并没输入任何指令,但是GDB却继续执行,这是因为我只是按了回车而已,GDB默认会重复上条指令。所以,如果我按下回车,GDB将会按照输入si继续执行
 1
 2
 3
 4
 5
 6
 7
 8
 9
10
11
(gdb)
0x08048451 in __do_global_ctors_aux ()
=> 0x08048451 <__do_global_ctors_aux+1>:     89 e5  mov    %esp,%ebp
(gdb) 
0x08048453 in __do_global_ctors_aux ()
=> 0x08048453 <__do_global_ctors_aux+3>:     53 push   %ebx
(gdb) 
0x08048454 in __do_global_ctors_aux ()
=> 0x08048454 <__do_global_ctors_aux+4>:     83 ec 04   sub    $0x4,%esp
(gdb) 
0x08048457 in __do_global_ctors_aux ()
  • 好的,现在我们已经执行完程序最开始的部分,接下来将要执行真正的代码了。
1
2
3
4
5
6
7
(gdb)
=> 0x08048457 <__do_global_ctors_aux+7>:     a1 14 9f 04 08 mov    0x8049f14,%eax
(gdb) 
0x0804845c in __do_global_ctors_aux ()
=> 0x0804845c <__do_global_ctors_aux+12>:    83 f8 ff   cmp    $0xffffffff,%eax
(gdb) p/x $eax
$1 = 0x80483b4
  • 我想知道加载完指针之后会是什么样,所以输入了p/x $eax,意思是以十六进制的形式打印寄存器%eax的内容。它不等于-1,所以我们假定程序将继续执行循环。现在由于我的最后一条指令是print指令,所以我不能按回车继续执行了,下次我就得输入si
 1
 2
 3
 4
 5
 6
 7
 8
 9
10
11
12
13
14
15
16
17
18
19
20
21
(gdb) si
0x0804845f in __do_global_ctors_aux ()
=> 0x0804845f <__do_global_ctors_aux+15>:    74 13  je     0x8048474 <__do_global_ctors_aux+36>
(gdb) 
0x08048461 in __do_global_ctors_aux ()
=> 0x08048461 <__do_global_ctors_aux+17>:    bb 14 9f 04 08 mov    $0x8049f14,%ebx
(gdb) 
0x08048466 in __do_global_ctors_aux ()
=> 0x08048466 <__do_global_ctors_aux+22>:    66 90  xchg   %ax,%ax
(gdb) 
0x08048468 in __do_global_ctors_aux ()
=> 0x08048468 <__do_global_ctors_aux+24>:    83 eb 04   sub    $0x4,%ebx
(gdb) 
0x0804846b in __do_global_ctors_aux ()
=> 0x0804846b <__do_global_ctors_aux+27>:    ff d0  call   *%eax
(gdb) 
a_constructor () at prog2.c:3
3   void __attribute__ ((constructor)) a_constructor() {
=> 0x080483b4 <a_constructor+0>:     55 push   %ebp
   0x080483b5 <a_constructor+1>:     89 e5  mov    %esp,%ebp
   0x080483b7 <a_constructor+3>:     83 ec 18   sub    $0x18,%esp
  • 这部分代码很有意思。我们一步步调用来看看。现在我们已经进入了我们自己写的函数a_constructor。因为GDB是能看到我们的源代码的,所以它在下一行给出了我们源码。又因为我打开了disassemble-next-line,所以它也会给出对应的汇编代码。这个例子中输出了函数最开始的部分,对应了函数的声明,所以我们得到了三行汇编。有意思吧?现在,我输入n命令,这个时候我们写的prinf就会被调用了。第一个n跳过了程序最开始的部分,第二个n执行prinf,第三个n执行了函数的结尾部分。如果你想知道为什么你需要在函数最开始和结束部分做些处理的话,现在,你使用GDB的单步调试应该能知道答案了吧。

  • 之前,我们已经把a_constructor字符串的地址作为printf的参数保存到了栈里,因为编译器足够的智能,发现实际上puts函数才是我们想要的,所以它调用了puts函数。

1
2
3
4
(gdb) n
4       printf("%s\n", __FUNCTION__);
=> 0x080483ba <a_constructor+6>:     c7 04 24 a5 84 04 08   movl   $0x80484a5,(%esp)
   0x080483c1 <a_constructor+13>:    e8 2a ff ff ff call   0x80482f0 <puts@plt>
  • 因为我们正在运行中来调试程序,所以我们看到了a_constructor打印出了上面的内容。后括号}对应了函数的结尾部分
1
2
3
4
5
(gdb) n
a_constructor
5   }
=> 0x080483c6 <a_constructor+18>:    c9 leave  
   0x080483c7 <a_constructor+19>:    c3 ret 
  • 有关leave指令实际操作
1
2
 movl %ebp, %esp
 popl %ebp
  • 继续执行,我们就退出了函数,并返回了调用函数。这里我又不得不输入si了:
 1
 2
 3
 4
 5
 6
 7
 8
 9
10
11
(gdb) n
0x0804846d in __do_global_ctors_aux ()
=> 0x0804846d <__do_global_ctors_aux+29>:    8b 03  mov    (%ebx),%eax
(gdb) si
0x0804846f in __do_global_ctors_aux ()
=> 0x0804846f <__do_global_ctors_aux+31>:    83 f8 ff   cmp    $0xffffffff,%eax
(gdb) 
0x08048472 in __do_global_ctors_aux ()
=> 0x08048472 <__do_global_ctors_aux+34>:    75 f4  jne    0x8048468 <__do_global_ctors_aux+24>
(gdb) p/x $eax
$2 = 0xffffffff
  • 我比较好奇,并且再次看了一下:这次,我们的函数指针指向了-1,所以,程序退出了循环
 1
 2
 3
 4
 5
 6
 7
 8
 9
10
11
12
13
14
15
(gdb) si
0x08048474 in __do_global_ctors_aux ()
=> 0x08048474 <__do_global_ctors_aux+36>:    83 c4 04   add    $0x4,%esp
(gdb) 
0x08048477 in __do_global_ctors_aux ()
=> 0x08048477 <__do_global_ctors_aux+39>:    5b pop    %ebx
(gdb) 
0x08048478 in __do_global_ctors_aux ()
=> 0x08048478 <__do_global_ctors_aux+40>:    5d pop    %ebp
(gdb) 
0x08048479 in __do_global_ctors_aux ()
=> 0x08048479 <__do_global_ctors_aux+41>:    c3 ret    
(gdb) 
0x080482bc in _init ()
=> 0x080482bc <_init+44>:    58 pop    %eax
  • 我们现在退回到了_init
 1
 2
 3
 4
 5
 6
 7
 8
 9
10
11
12
13
14
15
16
17
18
19
(gdb) 
0x080482bd in _init ()
=> 0x080482bd <_init+45>:    5b pop    %ebx
(gdb) 
0x080482be in _init ()
=> 0x080482be <_init+46>:    c9 leave  
(gdb) 
0x080482bf in _init ()
=> 0x080482bf <_init+47>:    c3 ret    
(gdb) 
0x080483f9 in __libc_csu_init ()
=> 0x080483f9 <__libc_csu_init+25>:  8d bb 1c ff ff ff  lea    -0xe4(%ebx),%edi
(gdb) q
A debugging session is active.

    Inferior 1 [process 17368] will be killed.

Quit anyway? (y or n) y
$

回到__libc_csu_init__

  • 源码
1
2
3
4
5
6
7
8
9
void __libc_csu_init (int argc, char **argv, char **envp)
{

  _init ();

  const size_t size = __init_array_end - __init_array_start;
  for (size_t i = 0; i < size; i++)
      (*__init_array_start [i]) (argc, argv, envp);
}
这是另一个函数的循环调用
  • __init__数组里面是什么呢?你肯定不会想到。你也可以在这个阶段自定义代码。这时刚刚从运行我们自定义的构造函数的_init函数返回,这意味着,在这个数组里面的内容将会在构造函数完成之后运行。你能通过某种方式告诉编译器你想在这个阶段运行某个你自定义的函数。这个函数也会收到和main函数相同的参数
1
2
3
4
5
void init(int argc, char **argv, char **envp) {
 printf("%s\n", __FUNCTION__);
}

__attribute__((section(".init_array"))) typeof(init) *__init = init;

程序将返回__libc_start_main__

  • 它调用了我们的main函数,然后把main函数的返回值传递给exit()函数
exit()函数运行了更多的循环
  • exit()函数按照注册顺序依次运行了在at_exit()中注册的函数。然后会运行另外一个循环,这次的循环是在__fini_数组中定义的。在运行完这些函数之后,就会调用析构函数。

这个程序,把上面所有的过程联系了起来

 1
 2
 3
 4
 5
 6
 7
 8
 9
10
11
12
13
14
15
16
17
18
19
20
21
22
23
24
25
26
27
28
29
30
31
32
33
34
35
36
37
38
#include <stdio.h>

void preinit(int argc, char **argv, char **envp) {
 printf("%s\n", __FUNCTION__);
}

void init(int argc, char **argv, char **envp) {
 printf("%s\n", __FUNCTION__);
}

void fini() {
 printf("%s\n", __FUNCTION__);
}

__attribute__((section(".init_array"))) typeof(init) *__init = init;
__attribute__((section(".preinit_array"))) typeof(preinit) *__preinit = preinit;
__attribute__((section(".fini_array"))) typeof(fini) *__fini = fini;

void  __attribute__ ((constructor)) constructor() {
 printf("%s\n", __FUNCTION__);
}

void __attribute__ ((destructor)) destructor() {
 printf("%s\n", __FUNCTION__);
}

void my_atexit() {
 printf("%s\n", __FUNCTION__);
}

void my_atexit2() {
 printf("%s\n", __FUNCTION__);
}

int main() {
 atexit(my_atexit);
 atexit(my_atexit2);
}
  • 编译并运行这个函数(这里我将其命名为hooks.c),输出如下:
1
2
3
4
5
6
7
8
9
$ ./hooks
preinit
constructor
init
my_atexit2
my_atexit
fini
destructor
$

回顾

  • 还是这张图
/img/Operating System/support2-1.png
总体流程图

总结

相关参考资料