Operating System
$Nanjing\ University\rightarrow Yanyan\ Jiang\newline$
多处理器编程:从入门到放弃
Overview
复习
程序 (源代码S、二进制代码C) = 状态机
编译器 $C = \textrm{compile}(S)\newline$
应用视角的操作系统 = syscall 指令
本次课回答的问题
Q : 在多处理器时代,上面的理解应该作出怎样的变化?
本次课主要内容
并发程序的状态机模型
线程库 thread.h
多线程带来的麻烦
入门
Three Easy Pieces: 并发
Concurrent: existing, happening, or done at the same time .
In computer science, concurrency refers to the ability of different parts or units of a program, algorithm, or problem to be executed out-of-order or in partial order, without affecting the final outcome. (Wikipedia)
为什么在这门课 (先) 讲并发?
讲并发
操作系统是最早的并发程序之一 今天遍地都是多处理器系统 (为什么?)
先讲并发
实验是 bottom-up 的 (L1: 多处理器上的 malloc/free)
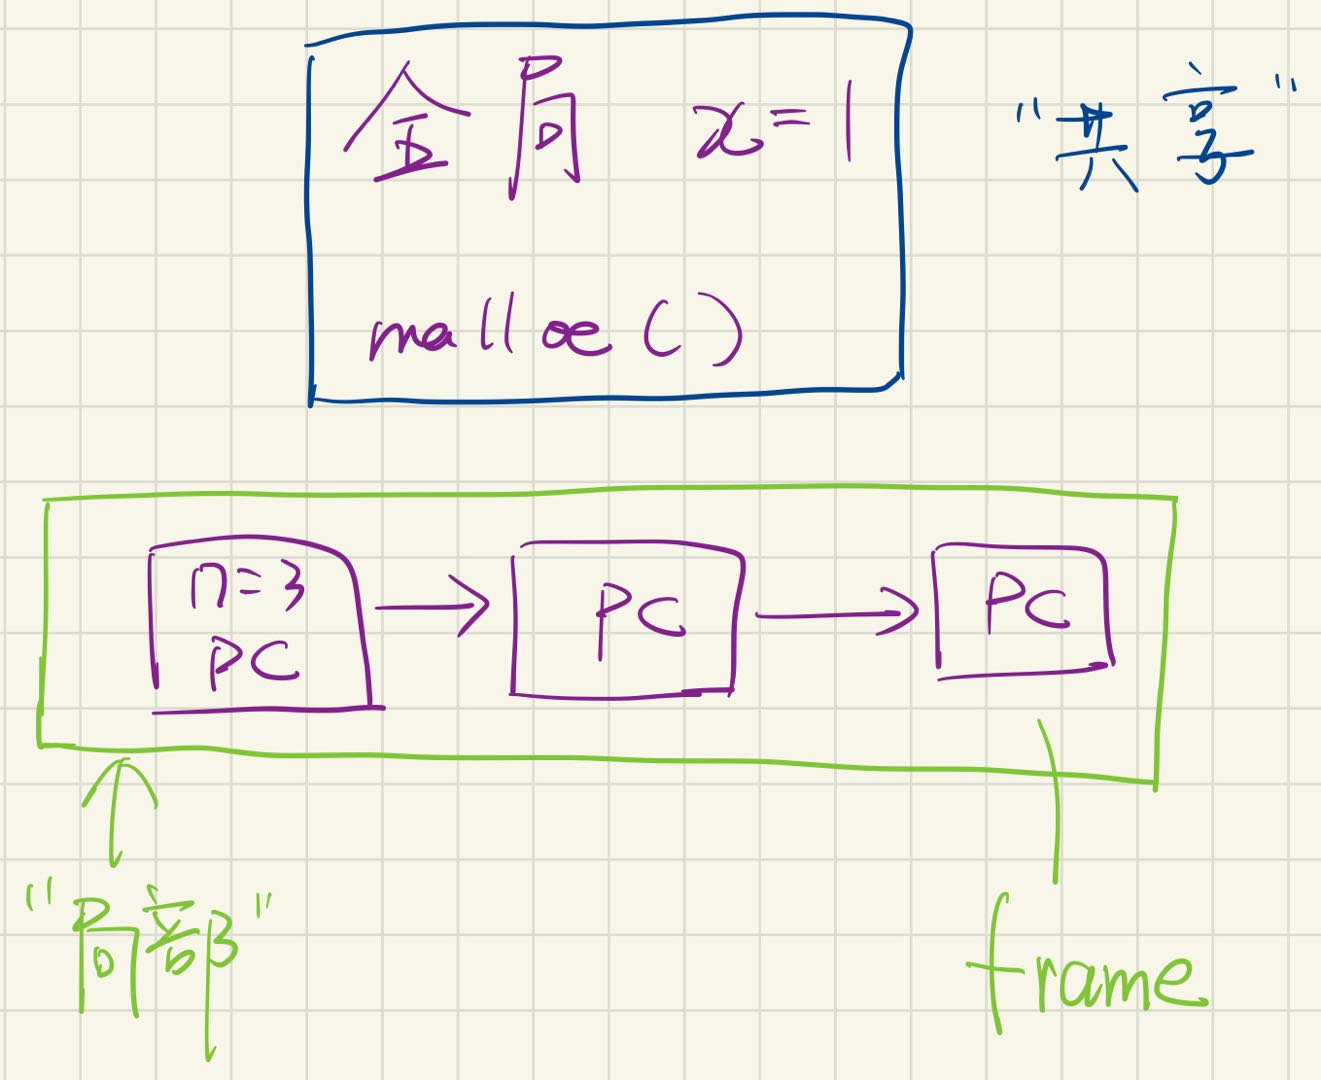
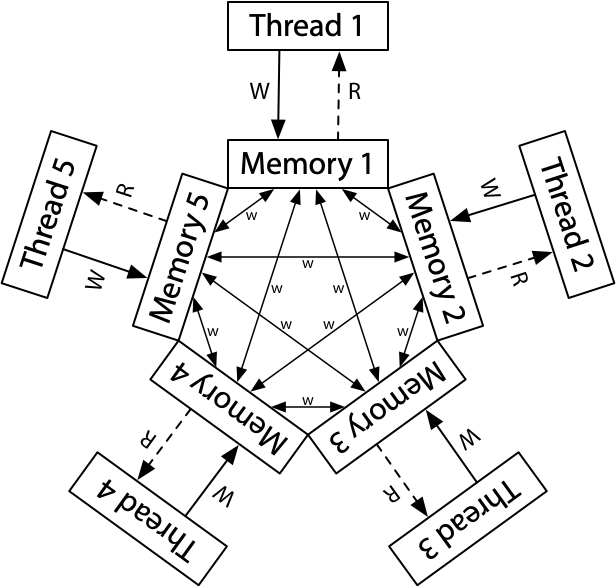
并发的基本单位:线程
共享内存的多个执行流
执行流拥有独立的堆栈/寄存器
共享全部的内存 (指针可以互相引用)
用状态机的视角就很容易理解了!
手写(状态机,stack frame与共享内存)
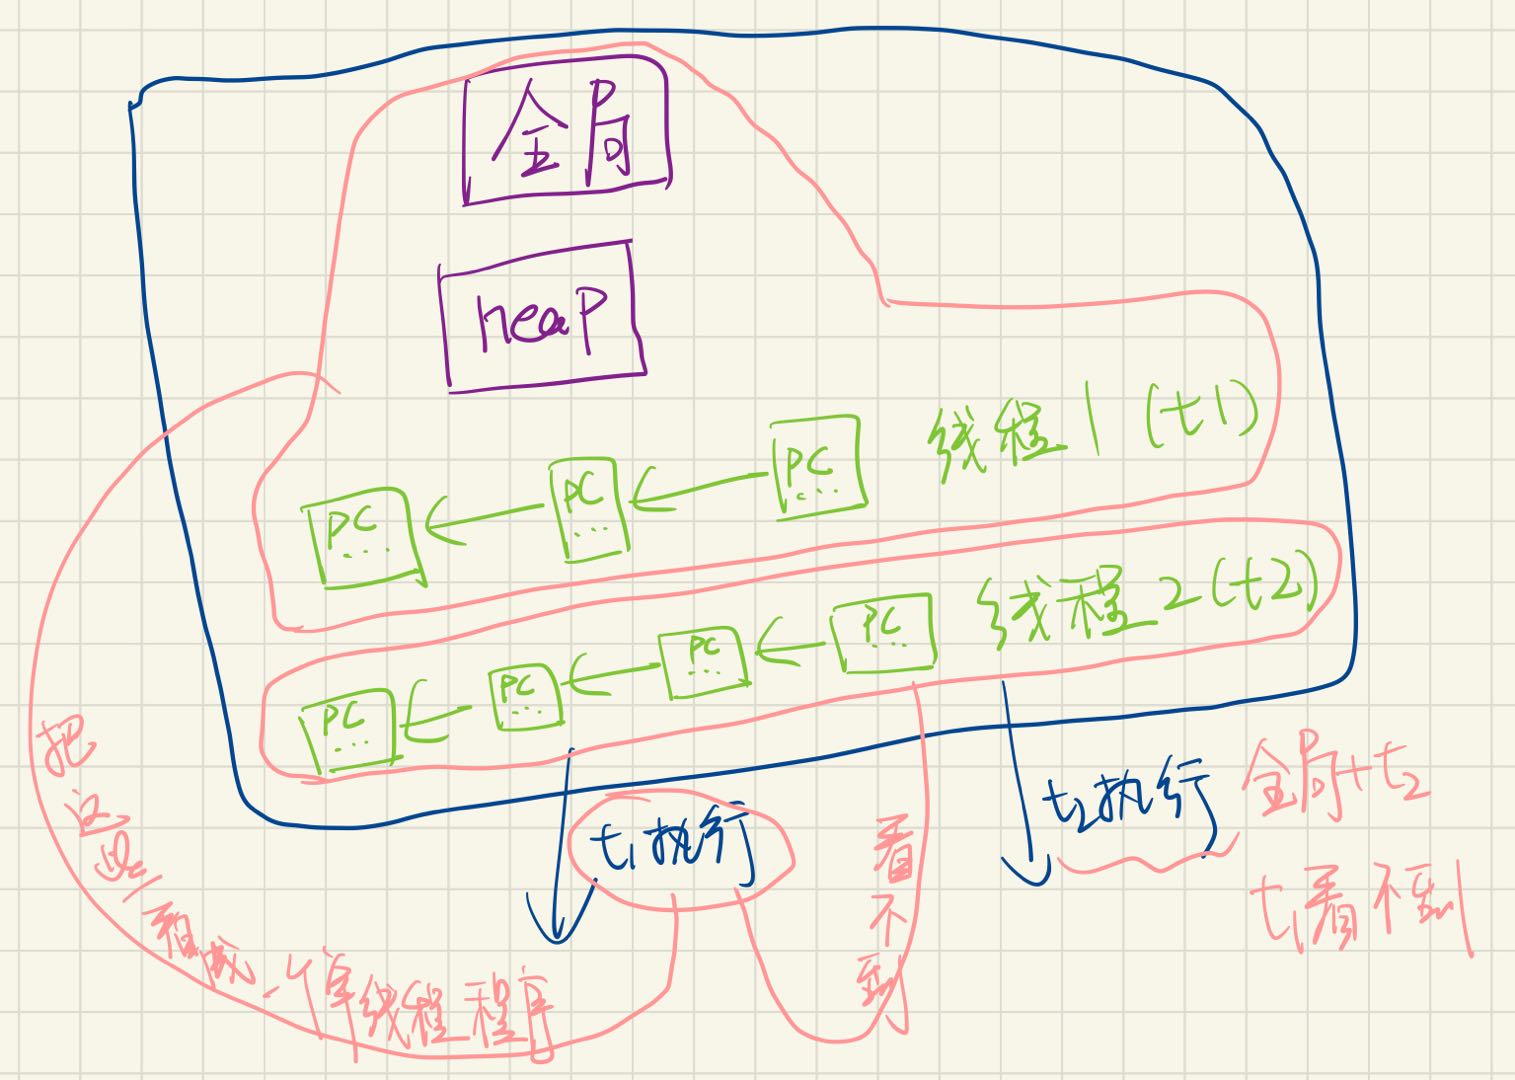
手写(线程)
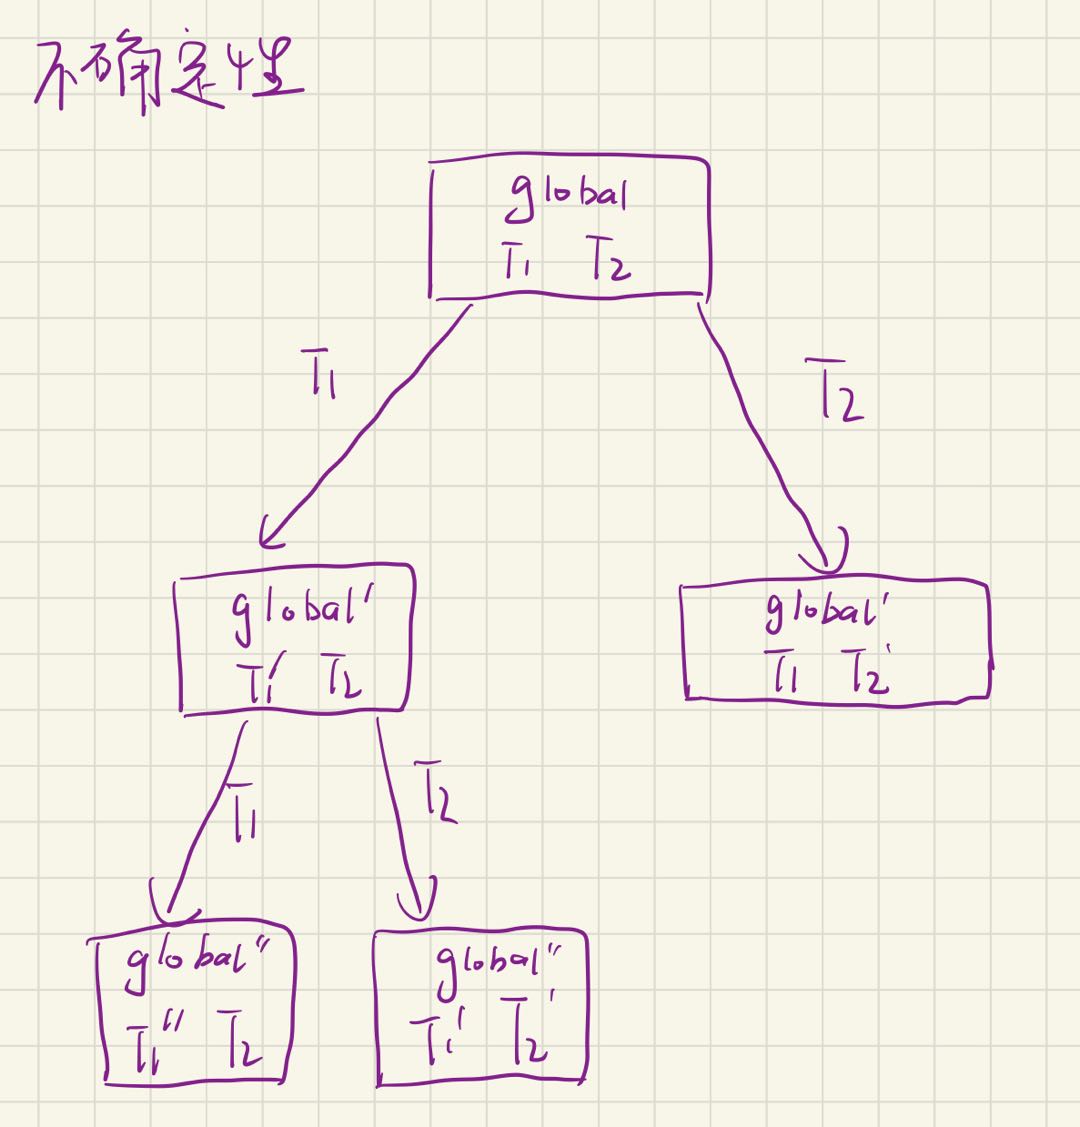
手写(并发编程的不确定性)
入门:thread.h 简化的线程 API
我们为大家封装了超级好用的线程 API (thread.h
thread.h
 1
 2
 3
 4
 5
 6
 7
 8
 9
10
11
12
13
14
15
16
17
18
19
20
21
22
23
24
25
26
27
28
29
30
31
32
33
34
35
36
37
38
39
40
41
42
43
44
45
46
47
48
#include <stdlib.h>
#include <stdio.h>
#include <string.h>
#include <stdatomic.h>
#include <assert.h>
#include <unistd.h>
#include <pthread.h>
#define NTHREAD 64
enum { T_FREE = 0 , T_LIVE , T_DEAD , };
struct thread {
int id , status ;
pthread_t thread ;
void ( * entry )( int );
};
struct thread tpool [ NTHREAD ], * tptr = tpool ;
void * wrapper ( void * arg ) {
struct thread * thread = ( struct thread * ) arg ;
thread -> entry ( thread -> id );
return NULL ;
}
void create ( void * fn ) {
assert ( tptr - tpool < NTHREAD );
* tptr = ( struct thread ) {
. id = tptr - tpool + 1 ,
. status = T_LIVE ,
. entry = fn ,
};
pthread_create ( & ( tptr -> thread ), NULL , wrapper , tptr );
++ tptr ;
}
void join () {
for ( int i = 0 ; i < NTHREAD ; i ++ ) {
struct thread * t = & tpool [ i ];
if ( t -> status == T_LIVE ) {
pthread_join ( t -> thread , NULL );
t -> status = T_DEAD ;
}
}
}
__attribute__ (( destructor )) void cleanup () {
join ();
}
入门 (cont’d)
Hello, Multi-threaded World!
1
2
3
4
5
6
7
8
9
#include "thread.h"
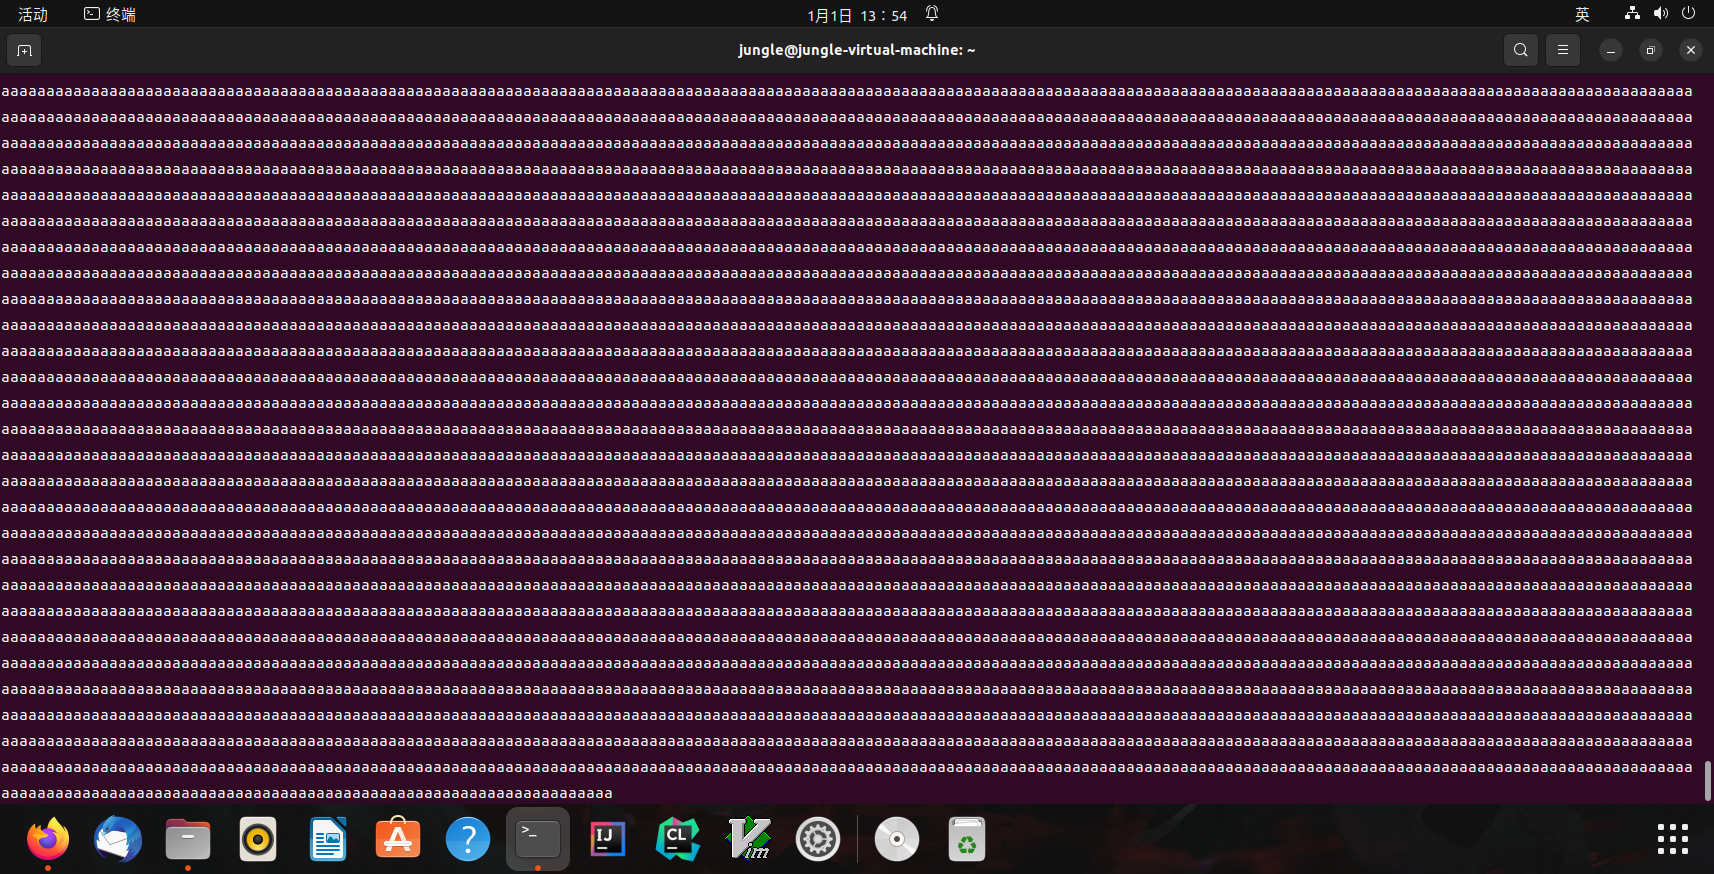
void Ta () { while ( 1 ) { printf ( "a" ); } }
void Tb () { while ( 1 ) { printf ( "b" ); } }
int main () {
create ( Ta );
create ( Tb );
}
编译(注意使用-lpthread)
1
jungle@jungle-virtual-machine:~$ gcc the.c -lpthread
运行 $\rightarrow$ 交替输出
Linux(输出结果)
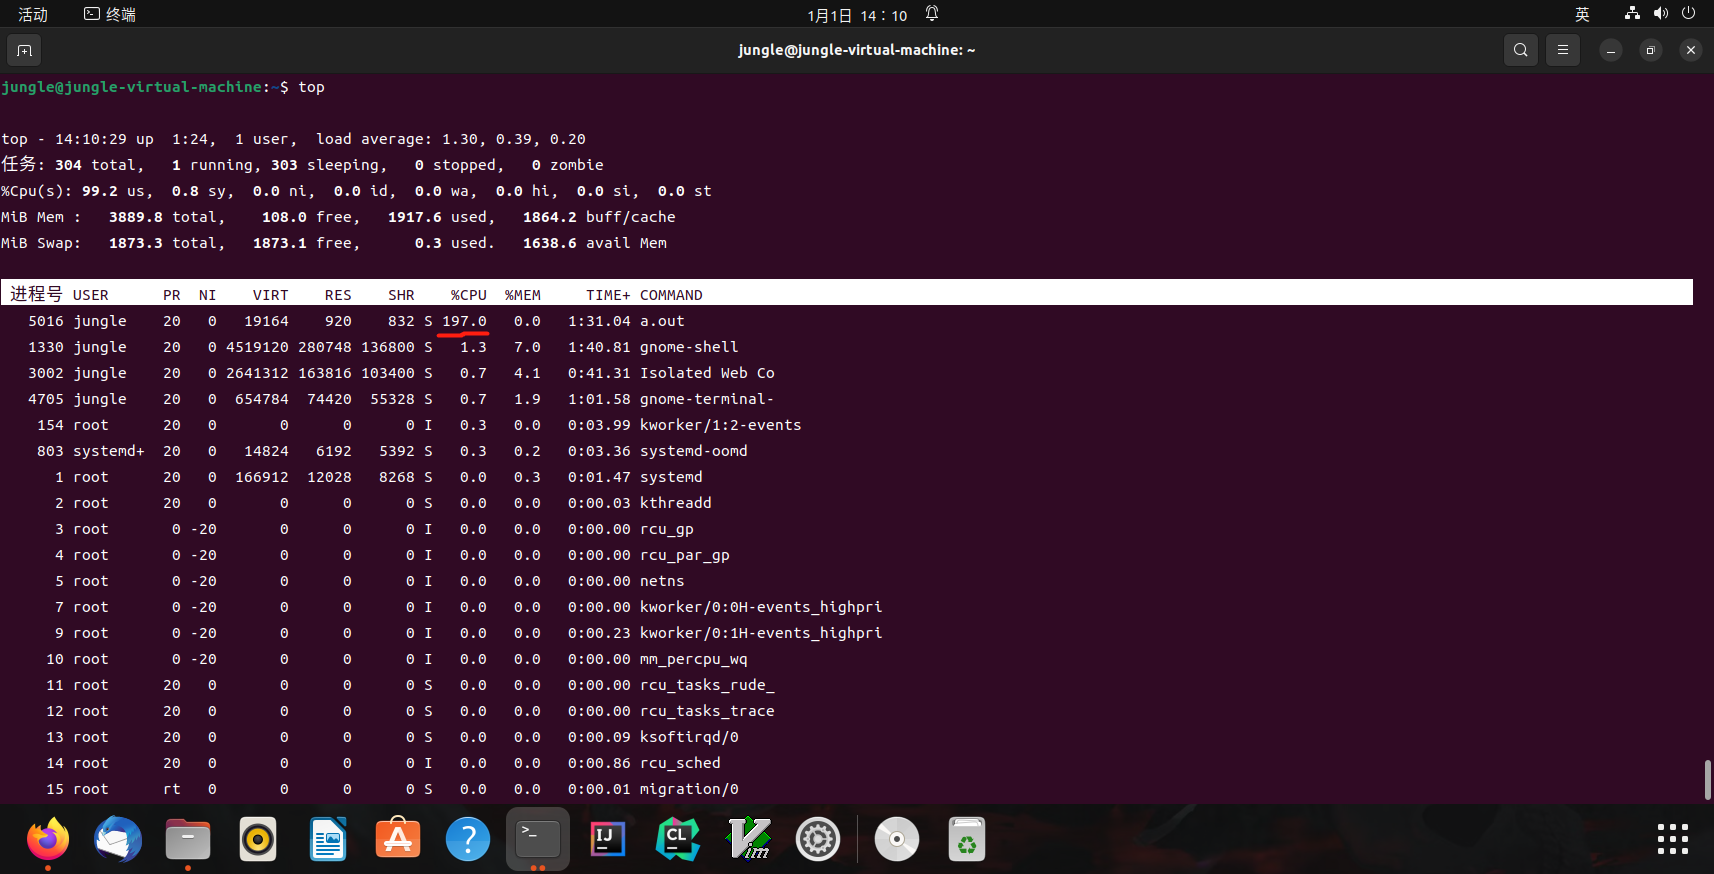
利用 thread.h 就可以写出利用多处理器的程序!
操作系统会自动把线程放置在不同的处理器上
在后台运行,可以看到 CPU 使用率超过了 100%(2个接近200, 4个接近400)$\rightarrow$ 使用了多个CPU
top(查看CPU使用率)
会编程,你就拥有全世界!
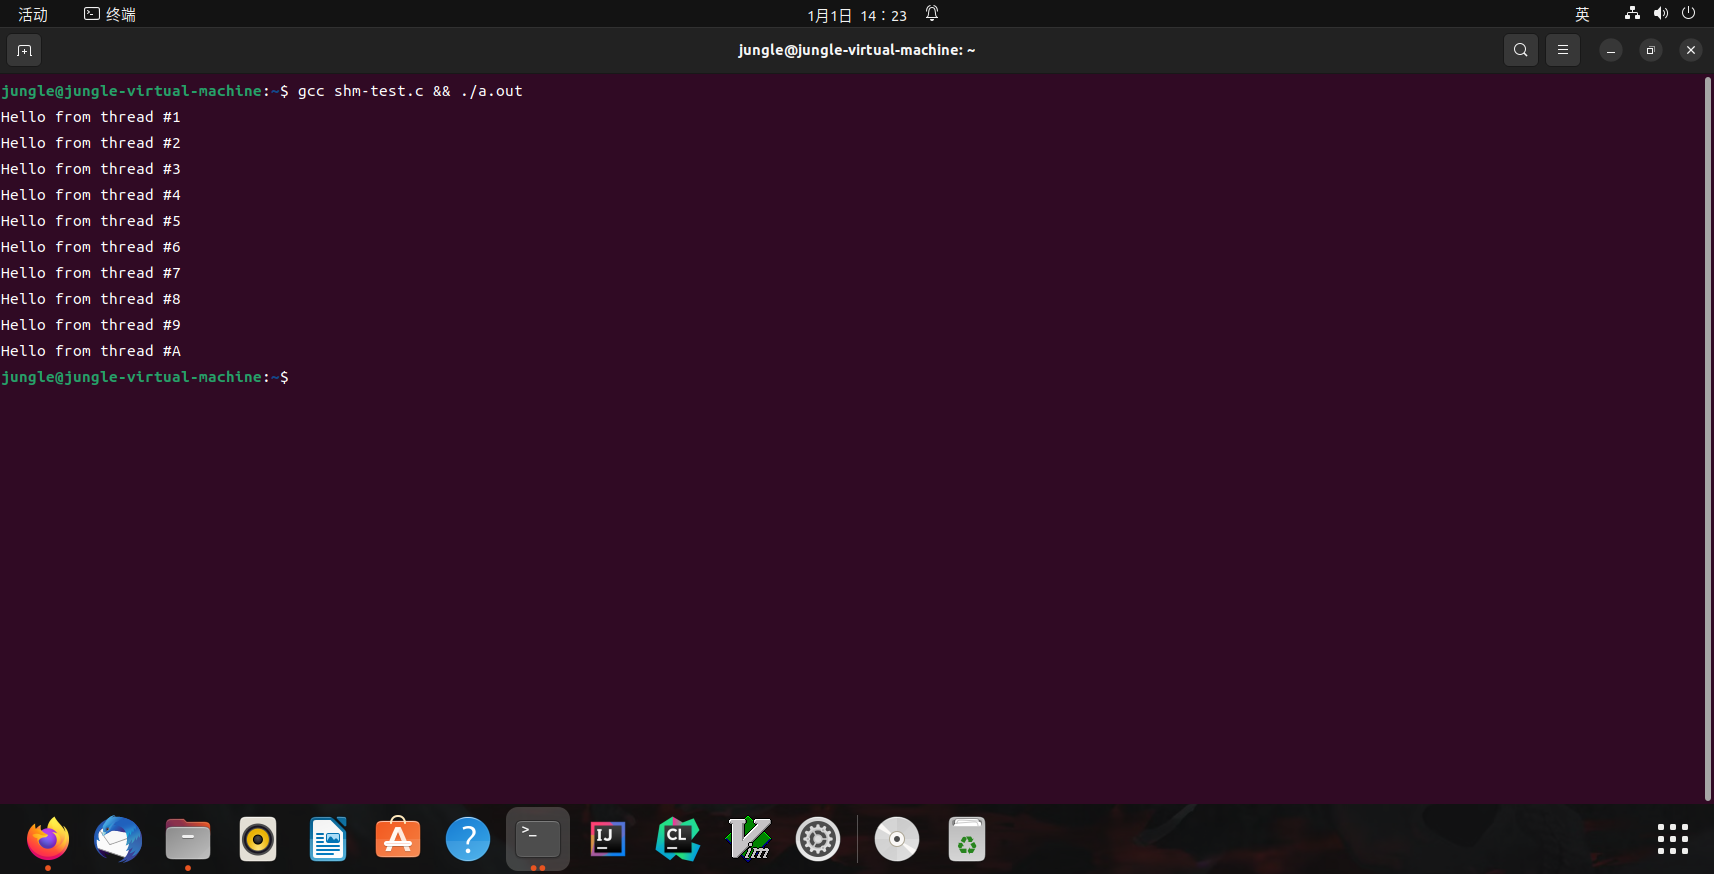
如何证明线程确实共享内存?
 1
 2
 3
 4
 5
 6
 7
 8
 9
10
11
12
13
14
#include "thread.h"
int x = 0 ;
void Thello ( int id ) {
usleep ( id * 100000 );
printf ( "Hello from thread #%c \n " , "123456789ABCDEF" [ x ++ ]);
}
int main () {
for ( int i = 0 ; i < 10 ; i ++ ) {
create ( Thello );
}
}
运行结果
Linux(shm-test.c运行结果)
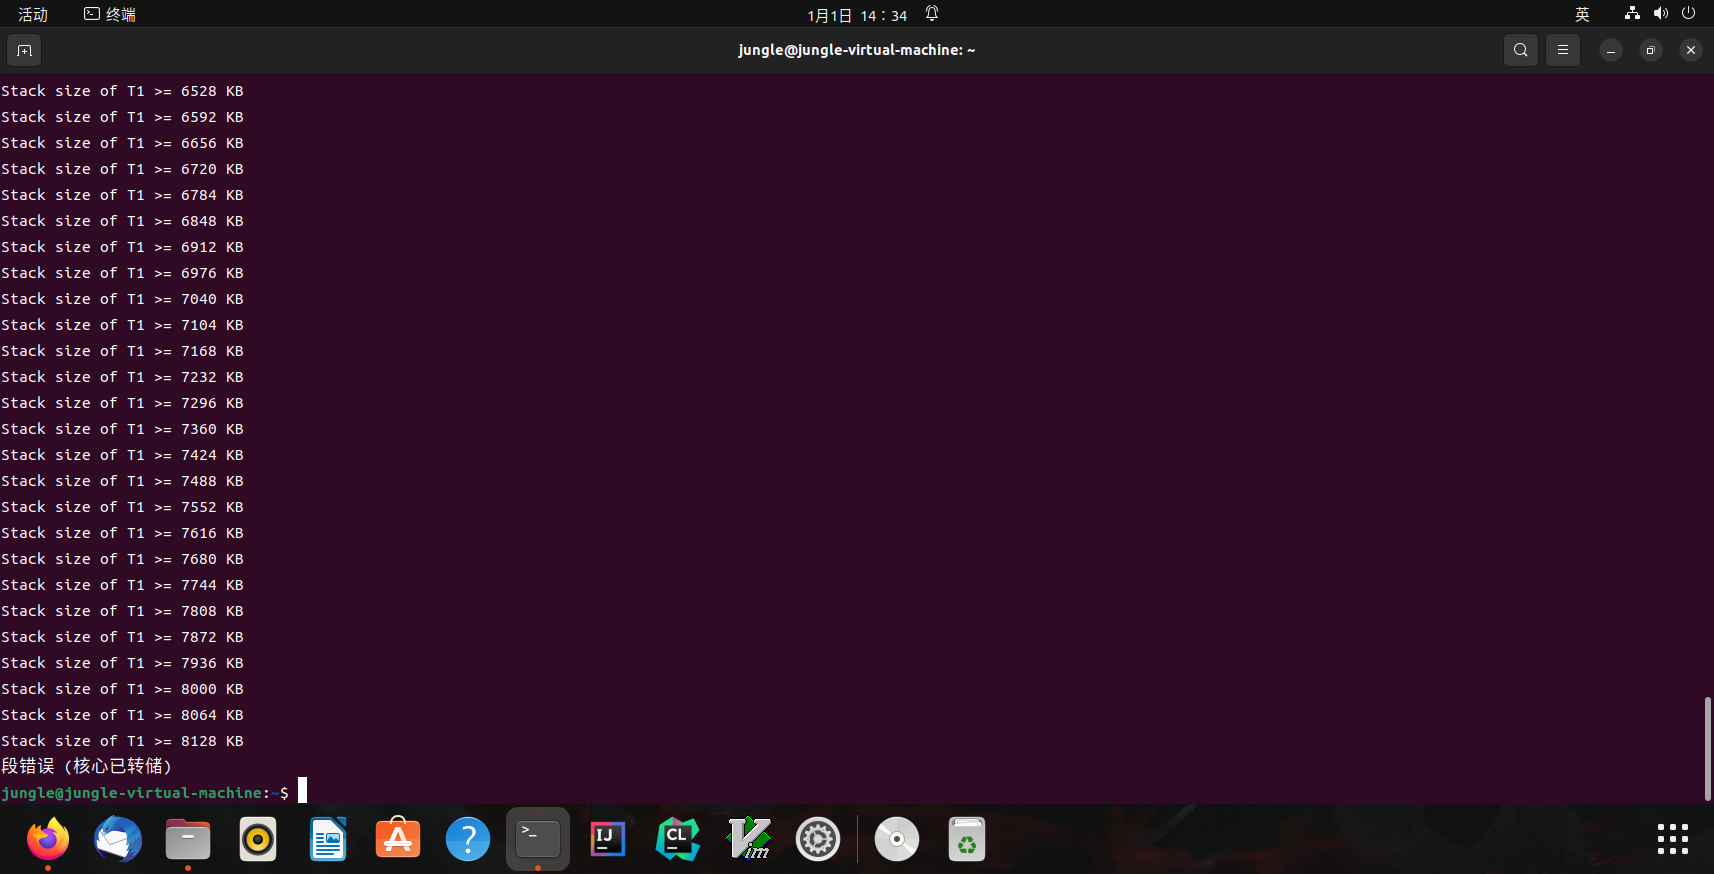
如何证明线程具有独立堆栈 (以及确定它们的范围)?
 1
 2
 3
 4
 5
 6
 7
 8
 9
10
11
12
13
14
15
16
17
18
19
20
21
22
23
24
25
26
27
28
29
30
#include "thread.h"
__thread char * base , * cur ; // thread-local variables
__thread int id ;
// objdump to see how thread-local variables are implemented
__attribute__ (( noinline )) void set_cur ( void * ptr ) { cur = ptr ; }
__attribute__ (( noinline )) char * get_cur () { return cur ; }
void stackoverflow ( int n ) {
set_cur ( & n );
if ( n % 1024 == 0 ) {
int sz = base - get_cur ();
printf ( "Stack size of T%d >= %d KB \n " , id , sz / 1024 );
}
stackoverflow ( n + 1 );
}
void Tprobe ( int tid ) {
id = tid ;
base = ( void * ) & tid ;
stackoverflow ( 0 );
}
int main () {
setbuf ( stdout , NULL );
for ( int i = 0 ; i < 4 ; i ++ ) {
create ( Tprobe );
}
}
运行结果
Linux(stack-probe.c运行结果)
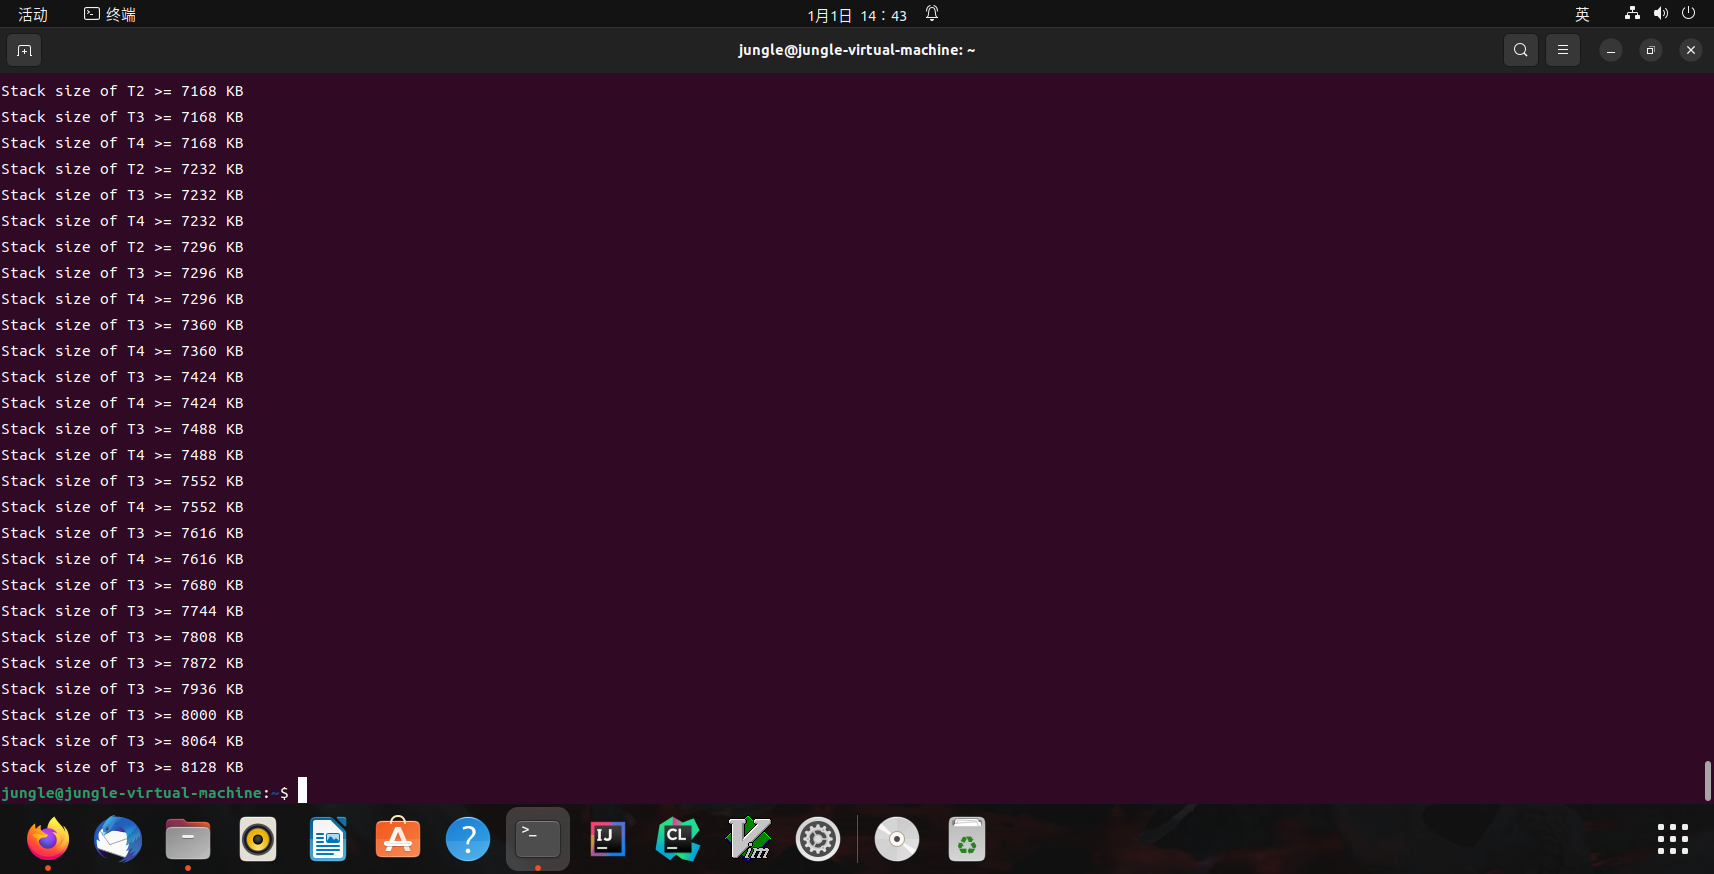
进行排序
1
jungle@jungle-virtual-machine:~$ gcc stack-probe.c -lpthread && ./a.out | sort -nk 6
效果:
stack-probe.c(排序后)
$size\ of\ stack=8192KB\newline$
更多的习题
创建线程使用的是哪个系统调用?
能不能用 gdb 调试?
基本原则:有需求,就能做到 (RTFM )
thread.h 背后:POSIX Threads想进一步配置线程?
设置更大的线程栈
设置 detach 运行 (不在进程结束后被杀死,也不能 join)
……
POSIX 为我们提供了线程库 (pthreads)
 1
 2
 3
 4
 5
 6
 7
 8
 9
10
11
12
13
14
15
16
17
18
19
20
21
22
23
24
25
26
27
28
29
30
#include "thread.h"
__thread char * base , * cur ; // thread-local variables
__thread int id ;
// objdump to see how thread-local variables are implemented
__attribute__ (( noinline )) void set_cur ( void * ptr ) { cur = ptr ; }
__attribute__ (( noinline )) char * get_cur () { return cur ; }
void stackoverflow ( int n ) {
set_cur ( & n );
if ( n % 1024 == 0 ) {
int sz = base - get_cur ();
printf ( "Stack size of T%d >= %d KB \n " , id , sz / 1024 );
}
stackoverflow ( n + 1 );
}
void Tprobe ( int tid ) {
id = tid ;
base = ( void * ) & tid ;
stackoverflow ( 0 );
}
int main () {
setbuf ( stdout , NULL );
for ( int i = 0 ; i < 4 ; i ++ ) {
create ( Tprobe );
}
}
然而,可怕的事情正在悄悄逼近……
放弃(1):原子性
例子:山寨多线程支付宝
1
2
3
4
5
6
7
8
9
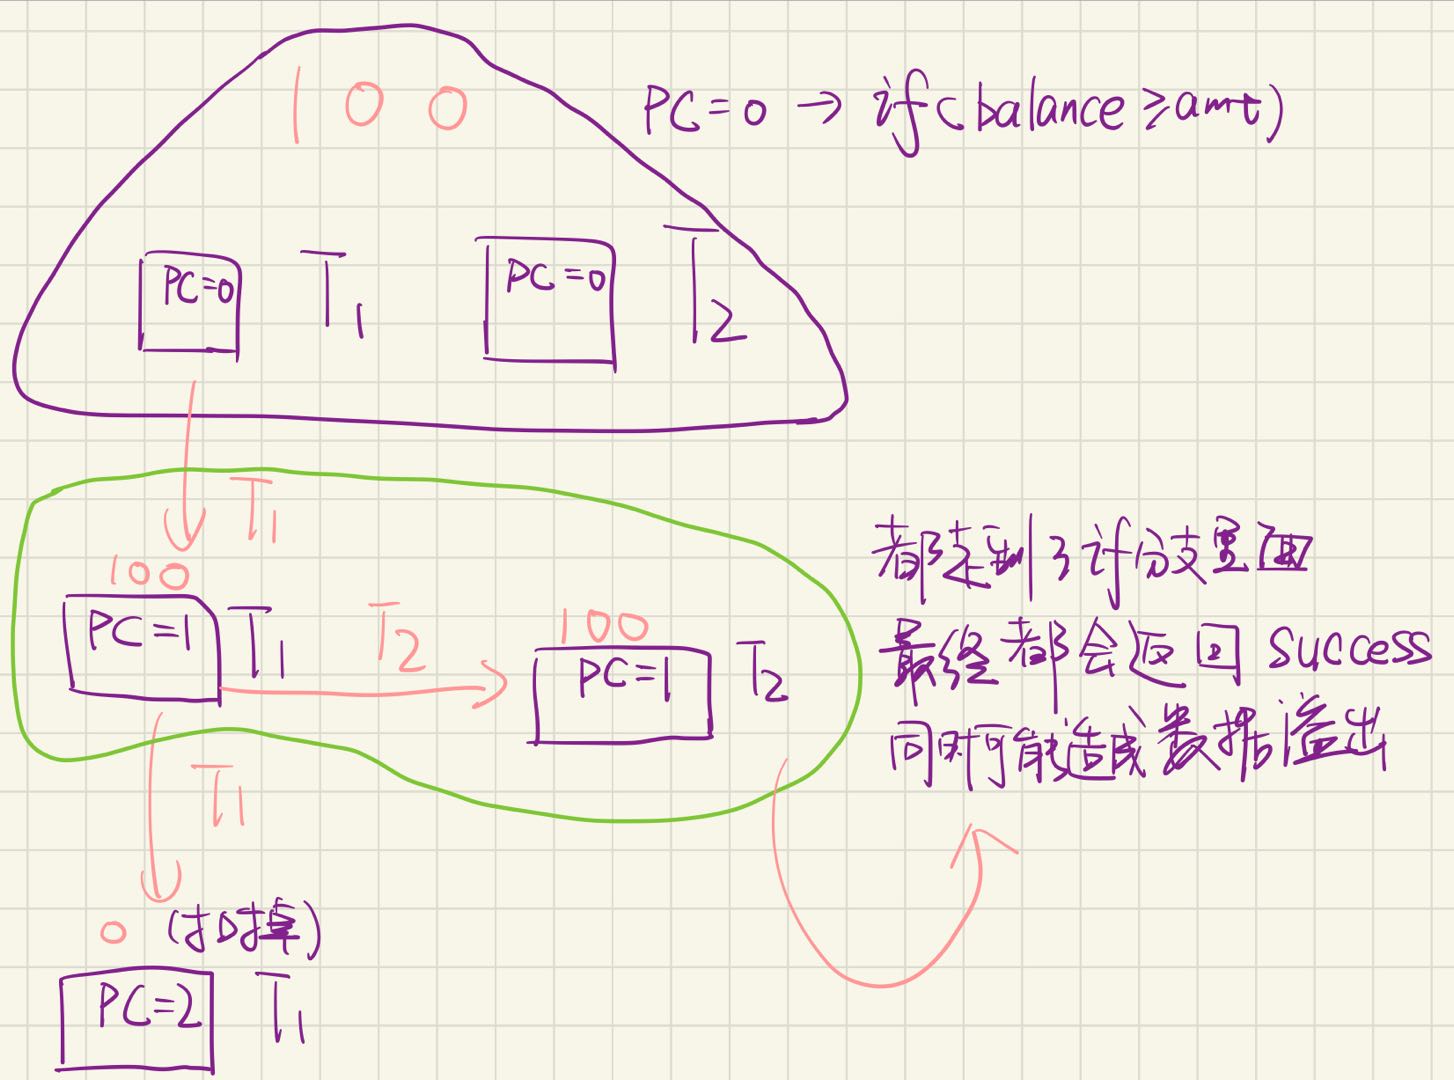
unsigned int balance = 100 ;
int Alipay_withdraw ( int amt ) {
if ( balance >= amt ) {
balance -= amt ;
return SUCCESS ;
} else {
return FAIL ;
}
}
两个线程并发支付 ¥100 会发生什么?alipay.c
手写(山寨支付宝状态机)
账户里会多出用不完的钱!
Bug/漏洞不跟你开玩笑:Mt. Gox Hack 损失650,000
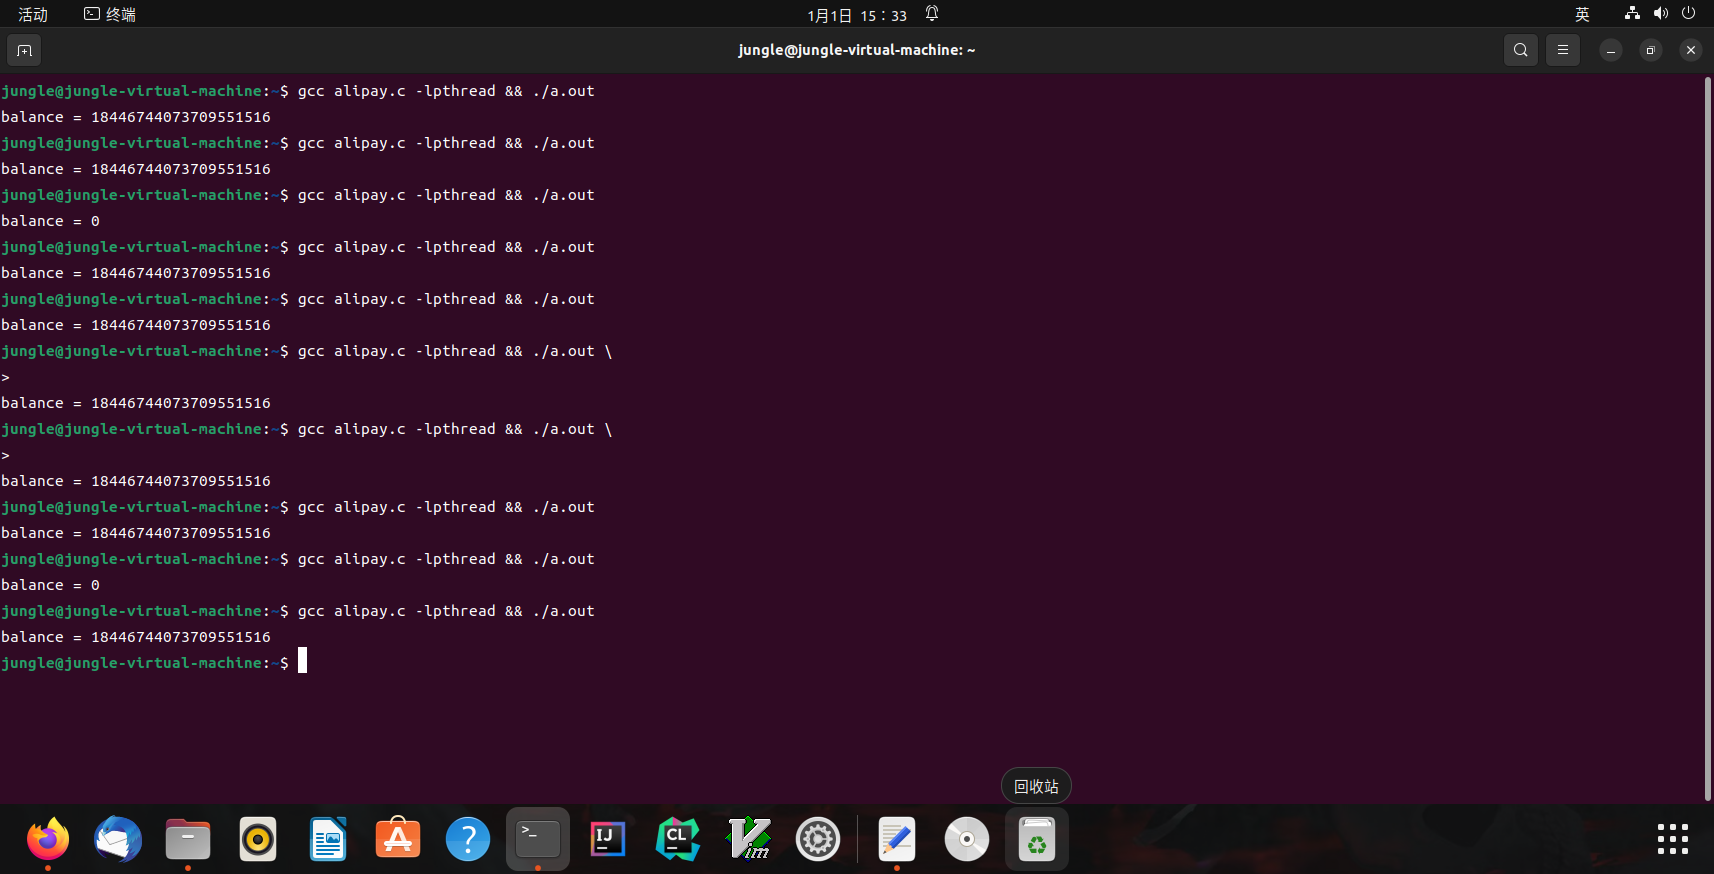
alipay.c
 1
 2
 3
 4
 5
 6
 7
 8
 9
10
11
12
13
14
15
16
17
18
19
20
21
#include "thread.h"
unsigned long balance = 100 ;
void Alipay_withdraw ( int amt ) {
if ( balance >= amt ) {
usleep ( 1 ); // unexpected delays
balance -= amt ;
}
}
void Talipay ( int id ) {
Alipay_withdraw ( 100 );
}
int main () {
create ( Talipay );
create ( Talipay );
join ();
printf ( "balance = %lu \n " , balance );
}
Linux(alipay.c运行结果)
例子:求和
分两个线程,计算 $1+1+1+\ldots+1+1+1+1+…+1$ (共计 2n 个 1)
 1
 2
 3
 4
 5
 6
 7
 8
 9
10
11
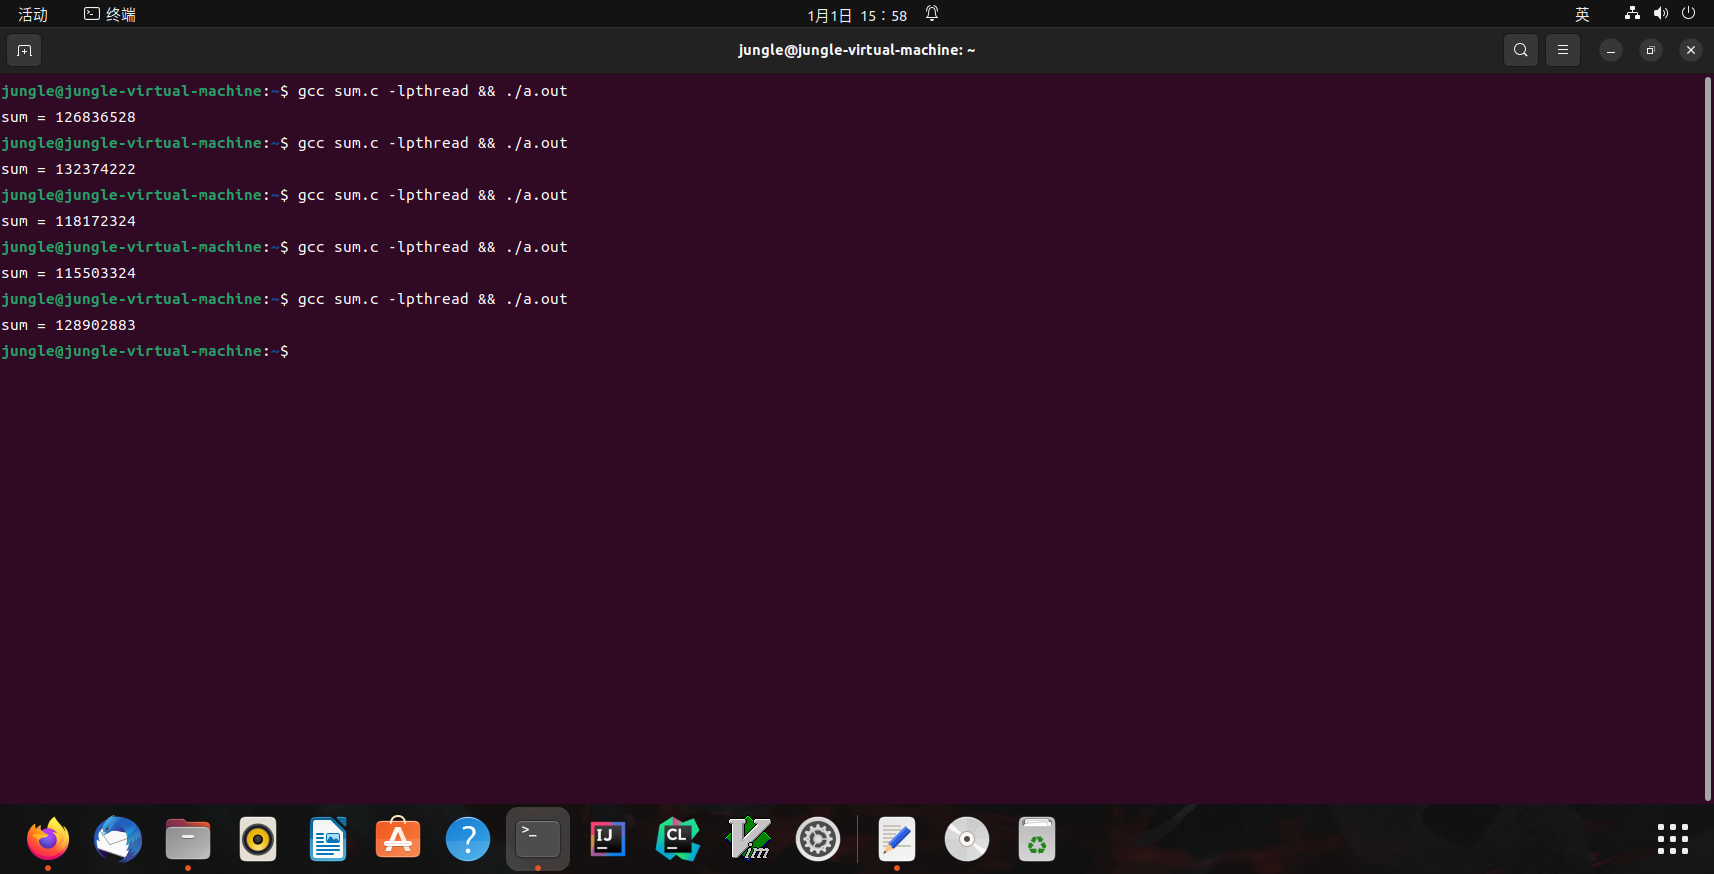
#define N 100000000
long sum = 0 ;
void Tsum () { for ( int i = 0 ; i < N ; i ++ ) sum ++ ; }
int main () {
create ( Tsum );
create ( Tsum );
join ();
printf ( "sum = %ld \n " , sum );
}
sum.c 运行结果
Linux(sum.c运行结果)
修改
 1
 2
 3
 4
 5
 6
 7
 8
 9
10
11
12
13
14
15
16
17
18
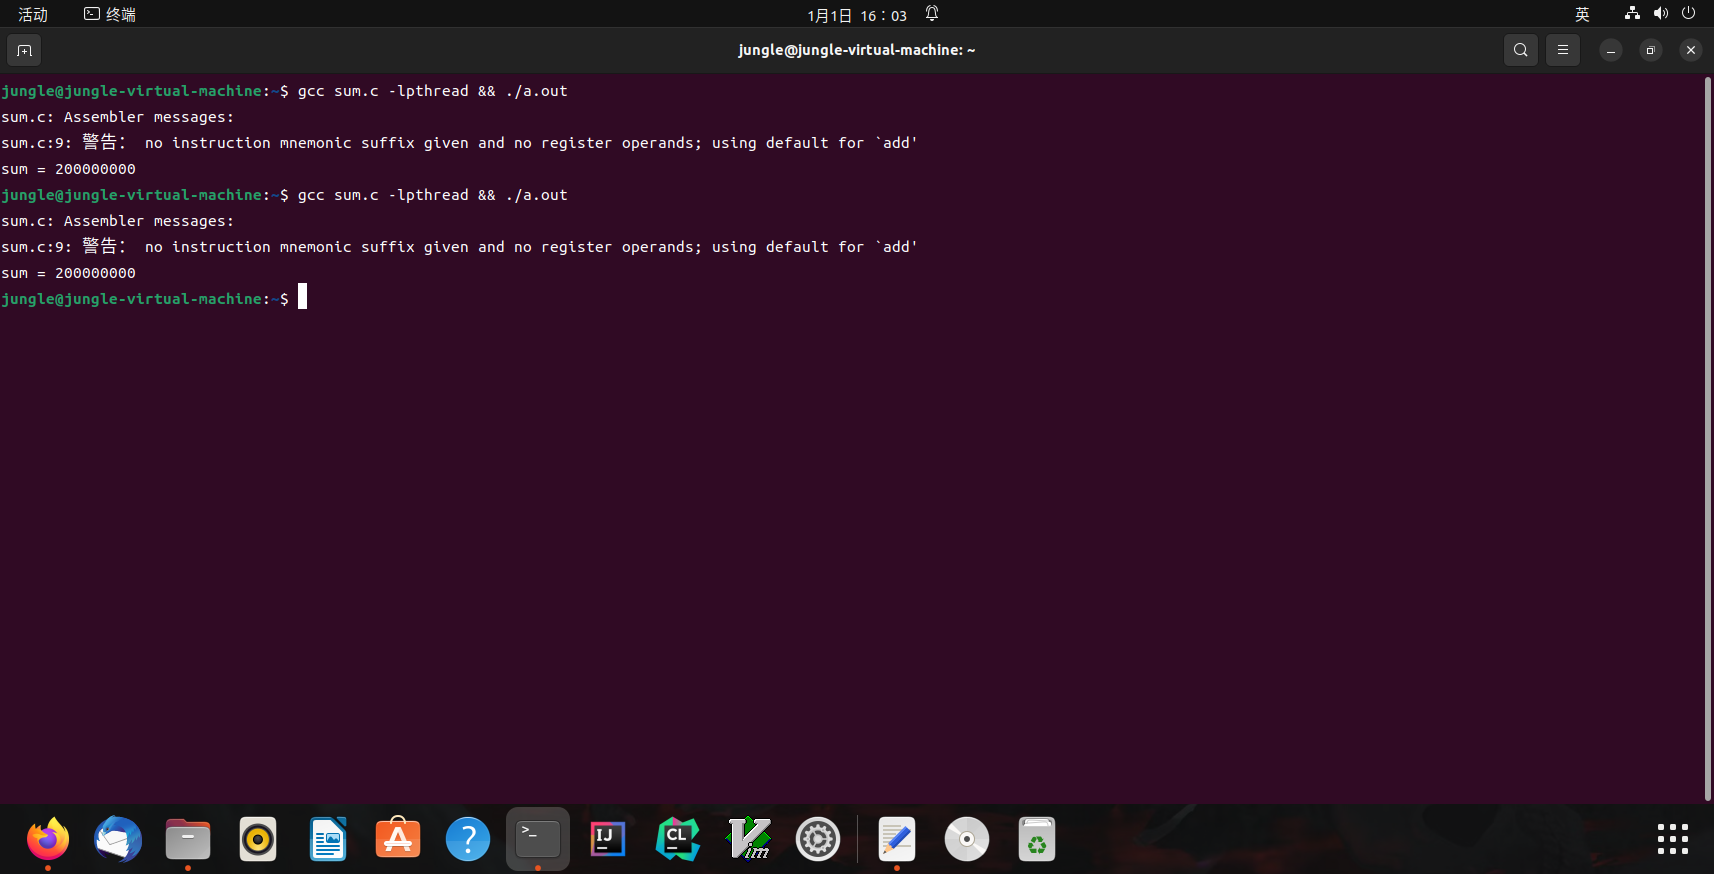
#include "thread.h"
#define N 100000000
long sum = 0 ;
void Tsum () {
for ( int i = 0 ; i < N ; i ++ ) {
asm volatile ( "lock add $1, %0" : "+m" ( sum ));
}
}
int main () {
create ( Tsum );
create ( Tsum );
join ();
printf ( "sum = %ld \n " , sum );
}
运行
Linux(sum.c修改后运行结果)
结果正确,但是运行性能显著下降
原子性的丧失
“程序 (甚至是一条指令) 独占处理器执行” 的基本假设在现代多处理器系统上不再成立。
原子性:一段代码执行 (例如 pay()) 独占整个计算机系统
(历史) 1960s,大家争先在共享内存上实现原子性 (互斥)
原子性的丧失:有没有感到后怕?
printf 还能在多线程程序里调用吗?
1
2
void thread1() { while (1) { printf("a"); } }
void thread2() { while (1) { printf("b"); } }
我们都知道 printf 是有缓冲区的 (为什么?)
如果执行 buf[pos++] = ch (pos 共享) 不就💥了吗?
RTFM!
命令
1
jungle@jungle-virtual-machine:~$ man 3 printf
查看
 1
 2
 3
 4
 5
 6
 7
 8
 9
10
11
ATTRIBUTES
For an explanation of the terms used in this section, see attributes( 7) .
┌────────────────────────┬───────────────┬────────────────┐
│Interface │ Attribute │ Value │
├────────────────────────┼───────────────┼────────────────┤
│printf() , fprintf() , │ Thread safety │ MT-Safe locale │
│sprintf() , snprintf() , │ │ │
│vprintf() , vfprintf() , │ │ │
│vsprintf() , vsnprintf() │ │ │
└────────────────────────┴───────────────┴────────────────┘
进程安全!
实现原子性
互斥和原子性是本学期的重要主题
lock(&lk)
unlock(&lk)
实现临界区 (critical section) 之间的绝对串行化
程序的其他部分依然可以并行执行
99% 的并发问题都可以用一个队列解决
放弃(2):顺序
例子:求和 (再次出现)
分两个线程,计算 $1+1+1+\ldots+1+1+1+1+…+1$ (共计 2n 个 1)
 1
 2
 3
 4
 5
 6
 7
 8
 9
10
11
#define N 100000000
long sum = 0 ;
void Tsum () { for ( int i = 0 ; i < N ; i ++ ) sum ++ ; }
int main () {
create ( Tsum );
create ( Tsum );
join ();
printf ( "sum = %ld \n " , sum );
}
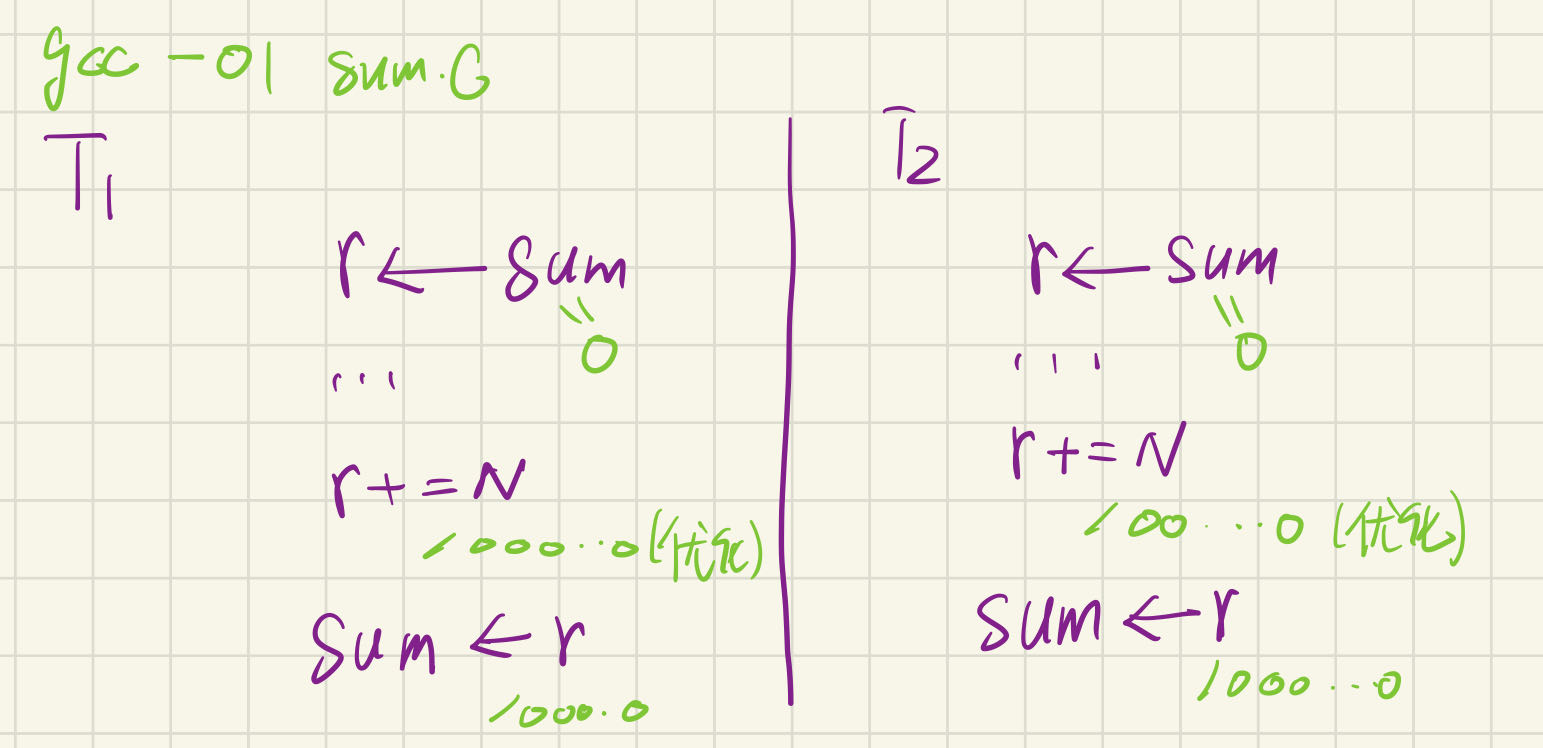
我们好像忘记给 sum.c 添加编译优化了?
-O1: 100000000 😱😱-O2: 200000000 😱😱😱
1
2
3
4
jungle@jungle-virtual-machine:~$ gcc -O1 sum.c -lpthread && ./a.out
sum = 100000000
jungle@jungle-virtual-machine:~$ gcc -O2 sum.c -lpthread && ./a.out
sum = 200000000
顺序的丧失
编译器对内存访问 “eventually consistent” 的处理导致共享内存作为线程同步工具的失效。
刚才的例子
-O1: R[eax] = sum; R[eax] += N; sum = R[eax]-O2: sum += N;(你的编译器也许是不同的结果)
另一个例子
1
2
3
while ( ! done );
// would be optimized to
if ( ! done ) while ( 1 );
 1
 2
 3
 4
 5
 6
 7
 8
 9
10
11
12
13
14
15
16
17
18
19
20
21
22
23
24
25
26
27
28
jungle@jungle-virtual-machine:~$ gcc -c -O1 sum.c && objdump -d sum.o
sum.o: 文件格式 elf64-x86-64
Disassembly of section .text:
0000000000000000 <wrapper>:
0: f3 0f 1e fa endbr64
4: 48 83 ec 08 sub $0 x8,%rsp
8: 48 89 f8 mov %rdi,%rax
b: 8b 3f mov ( %rdi) ,%edi
d: ff 50 10 call *0x10( %rax)
10: b8 00 00 00 00 mov $0 x0,%eax
15: 48 83 c4 08 add $0 x8,%rsp
19: c3 ret
000000000000001a <Tsum>:
1a: f3 0f 1e fa endbr64
1e: 48 8b 15 00 00 00 00 mov 0x0( %rip) ,%rdx # 25 <Tsum+0xb> -> R[eax] = sum
25: 48 8d 42 01 lea 0x1( %rdx) ,%rax # -> R[eax] += N, sum = R[eax]
29: 48 81 c2 01 e1 f5 05 add $0 x5f5e101,%rdx
30: 48 89 c1 mov %rax,%rcx
33: 48 83 c0 01 add $0 x1,%rax
37: 48 39 d0 cmp %rdx,%rax
3a: 75 f4 jne 30 <Tsum+0x16>
3c: 48 89 0d 00 00 00 00 mov %rcx,0x0( %rip) # 43 <Tsum+0x29>
43: c3 ret
手写(O1模式下优化)
 1
 2
 3
 4
 5
 6
 7
 8
 9
10
11
12
13
14
15
16
17
18
19
20
21
22
23
24
jungle@jungle-virtual-machine:~$ gcc -c -O2 sum.c && objdump -d sum.o
sum.o: 文件格式 elf64-x86-64
Disassembly of section .text:
0000000000000000 <wrapper>:
0: f3 0f 1e fa endbr64
4: 48 83 ec 08 sub $0 x8,%rsp
8: 48 89 f8 mov %rdi,%rax
b: 8b 3f mov ( %rdi) ,%edi
d: ff 50 10 call *0x10( %rax)
10: 31 c0 xor %eax,%eax
12: 48 83 c4 08 add $0 x8,%rsp
16: c3 ret
17: 66 0f 1f 84 00 00 00 nopw 0x0( %rax,%rax,1)
1e: 00 00
0000000000000020 <Tsum>:
20: f3 0f 1e fa endbr64
24: 48 81 05 00 00 00 00 addq $0 x5f5e100,0x0( %rip) # 2f <Tsum+0xf>
2b: 00 e1 f5 05
2f: c3 ret
O2优化的比较彻底,只add了一次(出问题的概率比较低)
实现源代码的按顺序翻译
在代码中插入 “优化不能穿越” 的 barrier
1
asm volatile ( "" ::: "memory" );
使用volatile变量
1
2
3
extern int volatile done ;
while ( ! done ) ;
放弃 (3):可见性
例子
 1
 2
 3
 4
 5
 6
 7
 8
 9
10
11
12
13
int x = 0 , y = 0 ;
void T1 () {
x = 1 ;
asm volatile ( "" : : "memory" ); // compiler barrier
printf ( "y = %d \n " , y );
}
void T2 () {
y = 1 ;
asm volatile ( "" : : "memory" ); // compiler barrier
printf ( "x = %d \n " , x );
}
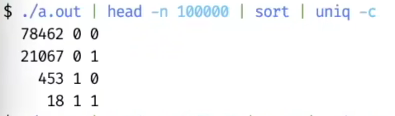
问题:我们最终能看到哪些结果?
状态机
mem-ordering.c
输出不好读?pipe to head -n 1000000 | sort | uniq -c
 1
 2
 3
 4
 5
 6
 7
 8
 9
10
11
12
13
14
15
16
17
18
19
20
21
22
23
24
25
26
27
28
29
30
31
32
33
34
35
36
37
38
39
40
41
42
43
44
45
46
47
48
49
50
51
52
53
54
55
56
57
58
59
60
61
62
63
64
65
#include "thread.h"
int x = 0 , y = 0 ;
atomic_int flag ; //开关初始为0(关着),原子变量
#define FLAG atomic_load(&flag) //原子读
#define FLAG_XOR(val) atomic_fetch_xor(&flag, val) //原子异或
#define WAIT_FOR(cond) while (!(cond)) ;
__attribute__ (( noinline ))
void write_x_read_y () {
int y_val ;
asm volatile (
"movl $1, %0;" // x = 1
"movl %2, %1;" // y_val = y
: "=m" ( x ), "=r" ( y_val ) : "m" ( y )
);
printf ( "%d " , y_val );
}
__attribute__ (( noinline ))
void write_y_read_x () {
int x_val ;
asm volatile (
"movl $1, %0;" // y = 1
"movl %2, %1;" // x_val = x
: "=m" ( y ), "=r" ( x_val ) : "m" ( x )
);
printf ( "%d " , x_val );
}
void T1 ( int id ) {
while ( 1 ) {
WAIT_FOR (( FLAG & 1 )); //等开关1
write_x_read_y ();
FLAG_XOR ( 1 ); //关掉开关1
}
}
void T2 () {
while ( 1 ) {
WAIT_FOR (( FLAG & 2 )); //等开关2
write_y_read_x ();
FLAG_XOR ( 2 ); //关掉开关2
}
}
void Tsync () { //控制线程
while ( 1 ) {
x = y = 0 ; //布置好初值
__sync_synchronize (); // full barrier
usleep ( 1 ); // + delay
assert ( FLAG == 0 ); //确定开关是关着的
FLAG_XOR ( 3 ); //开关的两个bit从0变为1(开启开关1,2)(原子操作)
// T1 and T2 clear 0/1-bit, respectively
WAIT_FOR ( FLAG == 0 );
printf ( " \n " ); fflush ( stdout );
}
}
int main () {
create ( T1 );
create ( T2 );
create ( Tsync );
}
-O2模式下编译
 1
 2
 3
 4
 5
 6
 7
 8
 9
10
11
00000000000001a0 <write_x_read_y>:
 1a0:	f3 0f 1e fa          	endbr64
 1a4:	c7 05 00 00 00 00 01 	movl   $0x1,0x0(%rip)        # 1ae <write_x_read_y+0xe>
 1ab:	00 00 00
 1ae:	8b 15 00 00 00 00    	mov    0x0(%rip),%edx        # 1b4 <write_x_read_y+0x14>
 1b4:	48 8d 35 00 00 00 00 	lea    0x0(%rip),%rsi        # 1bb <write_x_read_y+0x1b>
 1bb:	bf 01 00 00 00       	mov    $0x1,%edi
 1c0:	31 c0                	xor    %eax,%eax
 1c2:	e9 00 00 00 00       	jmp    1c7 <write_x_read_y+0x27>
 1c7:	66 0f 1f 84 00 00 00 	nopw   0x0(%rax,%rax,1)
 1ce:	00 00
利用脚本来统计,不知道为啥自己的乌班图💩🐴跑出来都是01,00,01,10,11都跑出来了,和我们的状态机模型不符🤡
From class(输出结果)
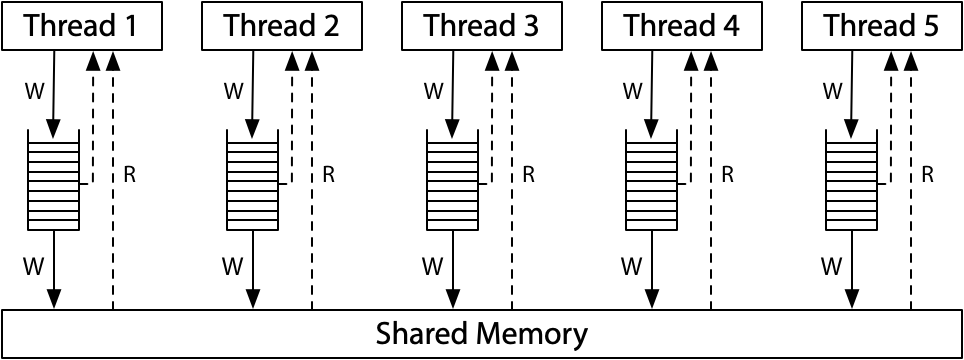
现代处理器:处理器也是 (动态) 编译器!
单个处理器把汇编代码 (用电路) “编译” 成更小的 $\mu ops\newline$
RF[9] = load(RF[7] + 400)
store(RF[12], RF[13])
RF[3] = RF[4] + RF[5]
每个 $\mu op$ 都有 Fetch, Issue, Execute, Commit 四个阶段
在任何时刻,处理器都维护一个 $\mu op$ 的 “池子”
每一周期向池子补充尽可能多的$\mu op\newline$
每一周期 (在不违反编译正确性的前提下) 执行尽可能多的$\mu op\newline$
这就是《计算机体系结构》 (剩下就是木桶效应,哪里短板补哪里)
神书(《计算机体系结构——量化研究方法》)
多处理器间即时可见性的丧失
满足单处理器 eventual memory consistency 的执行,在多处理器上可能无法序列化!
当 $x \ne y$ 时,对 $x ,y$ 的内存读写可以交换顺序
它们甚至可以在同一个周期里完成 (只要 load/store unit 支持)
如果写x发生 cache miss,可以让读y先执行
满足 “尽可能执行 “$\mu op$” 的原则,最大化处理器性能
1
2
3
     # <-----------+
movl $1, (x)   #   |
movl (y), %eax # --+
在多处理器上的表现
两个处理器分别看到 $y=0 和 x=0\newline$
宽松内存模型 (Relaxed/Weak Memory Model)
宽松内存模型的目的是使单处理器的执行更高效。
x86 已经是市面上能买到的 “最强” 的内存模型了 😂
x86(内存模型)
(x86-TSO in Hardware memory models by Russ Cox)
ARM/RISC-V
ARM/RISC-V(内存模型)
实现顺序一致性
改良(内存模型)
软件做不到,硬件来帮忙
Memory barrier: __sync_synchronize() (RTFM)
Compiler barrier + fence 指令
插入 fence 指令后,将阻止 x=y=0
原子指令 (lock,prefix, lr/sc, …)
修改
 1
 2
 3
 4
 5
 6
 7
 8
 9
10
11
12
13
14
15
16
17
18
19
20
21
22
23
24
25
26
27
28
29
30
31
32
33
34
35
36
37
38
39
40
41
42
43
44
45
46
47
48
49
50
51
52
53
54
55
56
57
58
59
60
61
62
63
64
65
66
67
#include "thread.h"
int x = 0 , y = 0 ;
atomic_int flag ;
#define FLAG atomic_load(&flag)
#define FLAG_XOR(val) atomic_fetch_xor(&flag, val)
#define WAIT_FOR(cond) while (!(cond)) ;
__attribute__ (( noinline ))
void write_x_read_y () {
int y_val ;
asm volatile (
"movl $1, %0;" // x = 1
"mfence;"
"movl %2, %1;" // y_val = y
: "=m" ( x ), "=r" ( y_val ) : "m" ( y )
);
printf ( "%d " , y_val );
}
__attribute__ (( noinline ))
void write_y_read_x () {
int x_val ;
asm volatile (
"movl $1, %0;" // y = 1
"mfence;"
"movl %2, %1;" // x_val = x
: "=m" ( y ), "=r" ( x_val ) : "m" ( x )
);
printf ( "%d " , x_val );
}
void T1 ( int id ) {
while ( 1 ) {
WAIT_FOR (( FLAG & 1 ));
write_x_read_y ();
FLAG_XOR ( 1 );
}
}
void T2 () {
while ( 1 ) {
WAIT_FOR (( FLAG & 2 ));
write_y_read_x ();
FLAG_XOR ( 2 );
}
}
void Tsync () {
while ( 1 ) {
x = y = 0 ;
__sync_synchronize (); // full barrier
usleep ( 1 ); // + delay
assert ( FLAG == 0 );
FLAG_XOR ( 3 );
// T1 and T2 clear 0/1-bit, respectively
WAIT_FOR ( FLAG == 0 );
printf ( " \n " ); fflush ( stdout );
}
}
int main () {
create ( T1 );
create ( T2 );
create ( Tsync );
}
不会再看见00的组合了
总结
本次课回答的问题
Take-away message
多处理器编程:入门
多处理器程序 = 状态机 (共享内存;非确定选择线程执行)
thread.h = create + join
多处理器编程:放弃你对 “程序” 的旧理解
不原子、能乱序、不立即可见(现代处理器就是一个动态的数据流分析器)
声明:本文章引用资料与图像均已做标注,如有侵权本人会马上删除